This is part 2 of a 4-part project to build a generic TCP proxy. This proxy will be capable of handling any TCP-based protocol, not just HTTP.
In this part we’re going to build a fake DNS server that runs on your laptop. We will configure your smartphone to use this server whenever it needs to use DNS to resolve a hostname to an IP address. When your smartphone asks our server for the IP address for the hostname of our target app (say, api.targetapp.com), our server will lie. Instead of returning the real IP address of our target app, it will return the local IP address of your laptop.
Your smartphone will trust our server’s response, and will believe that your laptop’s local IP really is the correct IP address for api.targetapp.com. Now, whenever your smartphone wants to send api.targetapp.com some data, it will send it to your laptop, instead of the real TargetApp’s servers. This will complete the first hop that your smartphone’s data must make through our proxy system. In parts 3 and 4 of this project we will build a proxy server that listens for and makes use of this rerouted data.
1. Taking a closer look at DNS
Before starting work on our fake DNS server, we’ll use some existing tools to study some real DNS requests in detail. We’ll also handcraft and spoof some DNS responses, proving to ourselves that your phone will indeed trust and act on DNS responses containing lies invented by your laptop. Despite the fact that our proxy is explicitly designed to be able to handle non-HTTP TCP traffic, we’re going to start by testing it using HTTP requests. This is purely for simplicity. It’s usually easier to get your smartphone to make an HTTP request than any other type of TCP request, since all you have to do to trigger one is visit a website. Our proxy isn’t “non-HTTP” - it’s “non-HTTP-specific”.
If you haven’t already, download Wireshark and netcat (included as part of nmap).
1.1 Send your smartphone’s DNS requests to your laptop
We’re going to start by making your smartphone send its DNS requests to your laptop, instead of whichever real DNS server (for example Verisign, Google or OpenDNS) it is currently configured to use.
First, make sure that your laptop and smartphone are connected to the same wireless network.
Next, find your laptop’s local IP address by running a terminal command like ifconfig | grep 'en0' -A 2 | grep netmask (try ipconfig if you’re on Windows). The command should print your laptop’s local IP address to your terminal. This will probably look something like 192.168.x.y.
Now find your smartphone’s DNS settings page. Here you can change the DNS server that your smartphone sends its DNS requests to. Update the DNS server IP address to be your laptop’s local IP address, which we just found. Try visiting a few websites and using a few apps - you should find that none of them work. I promise that this is progress.
Your smartphone has stopped functioning because it has started sending all its DNS requests to your laptop. Since your laptop has no idea what to do with these requests, it is dropping them on the floor without responding. This means that your smartphone is unable to resolve hostname to IP addresses. Whilst it is still technically connected to the internet, we’ve broken one of its primary mechanisms for working out how to use it. Routing on the internet is done using IP addresses, not hostnames. The internet backbone has no idea how to get to targetapp.com, any more than your taxi driver knows how to get to Tiffany's house.
1.2 Probing DNS requests
1.2.1 Probing DNS requests using Wireshark
We’ve successfully broken your phone. I have claimed that this is good news, because it shows that your phone has started sending its DNS requests to your laptop. Let’s check that I’m right by using Wireshark, a packet sniffer, to inspect your laptop’s network traffic and looking for your phone’s doomed DNS requests. We can confirm that they are indeed being sent to your laptop, and that your laptop currently isn’t sending your phone back any DNS responses.
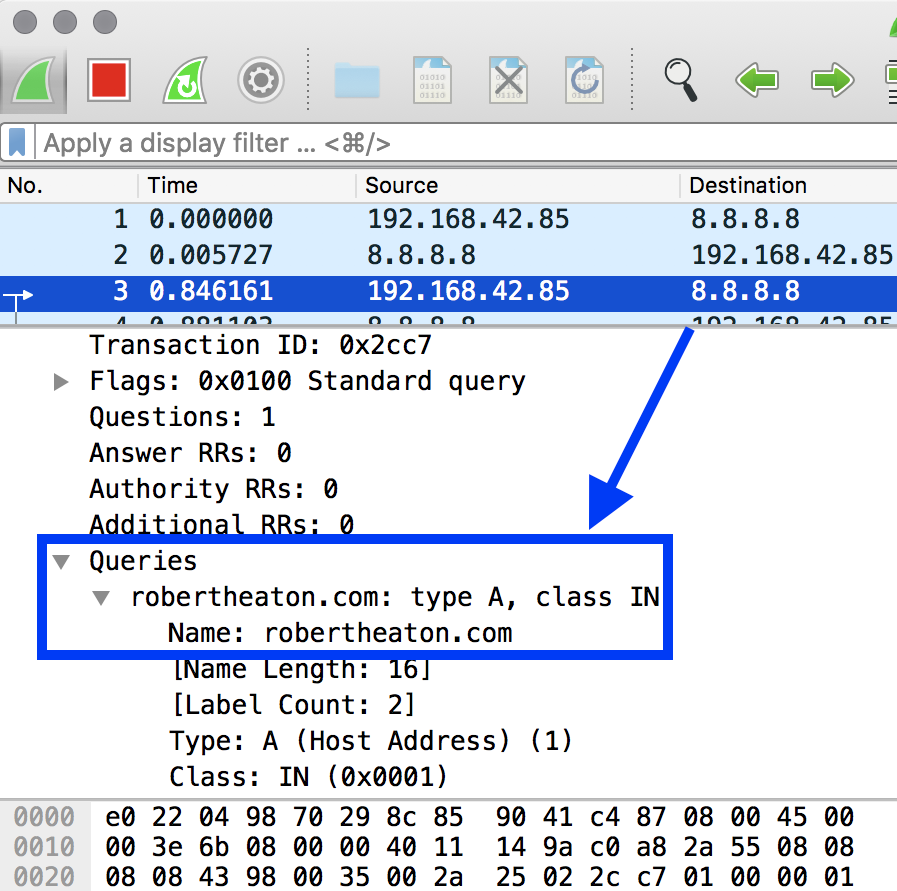
Before we get your phone involved, let’s do a basic check that Wireshark is working. Open up Wireshark on your laptop, and run it using the filter term udp port 53. DNS requests are sent over the UDP protocol on port 53, and this will screen out network traffic we aren’t interested in. Now, on your laptop, visit a website, any website. You should see a DNS request and response for this website’s hostname appear in Wireshark. This is your laptop making its own DNS request to a real DNS server, so that it can send the HTTP request for (say) robertheaton.com from your browser to the correct IP address.
DNS Request
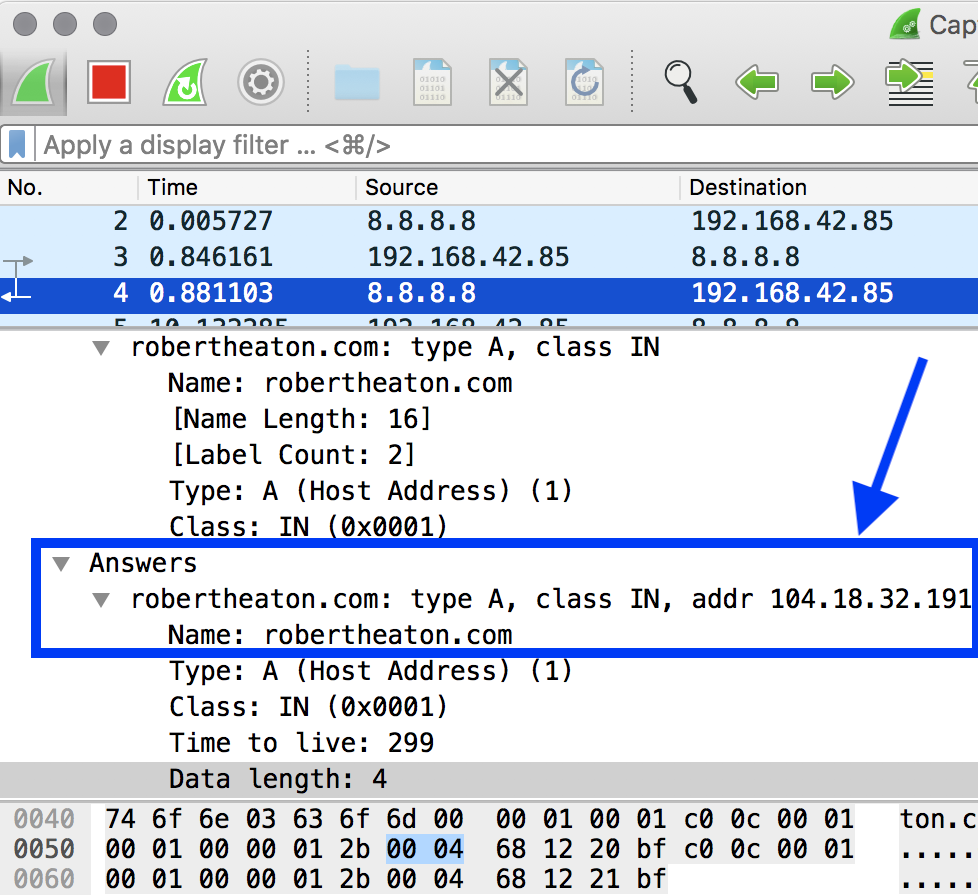
DNS Response
If this doesn’t work then try a few other websites as well. Your laptop may have recently made a DNS request for robertheaton.com, and may have cached the response it received.
Now let’s view some DNS requests from your phone. First, let’s adjust the Wireshark filter. The udp port 53 filter shows both DNS requests sent to and by your laptop. Let’s tighten it to show only requests sent to your laptop, by your phone. Update your Wireshark filter to udp port 53 && dst $YOUR_LAPTOPS_IP. On your smartphone (with its DNS server still set to your laptop), visit another website (again, you may have to try a few times because of DNS caching). You should see a DNS request for this website’s hostname appear in Wireshark, with its UDP packet “destination IP” field set to your laptop. If you do, then this confirms that your phone is talking to your laptop - this is a great breakthrough! However, Wireshark will not yet show a corresponding DNS response. This is because we haven’t yet told your laptop what it should actually do when it receives a UDP packet on port 53.
Before we start work on educating your laptop, let’s take a second look at DNS traffic from a different angle using Netcat.
1.2.2 Probing DNS requests using Netcat
We have used Wireshark to passively inspect packets as they pass through your laptop. Now we’re going to use a different tool called netcat to actively listen for incoming DNS requests, and to even send back rudimentary DNS responses. This will allow your phone to begin talking to (some of) the internet again.
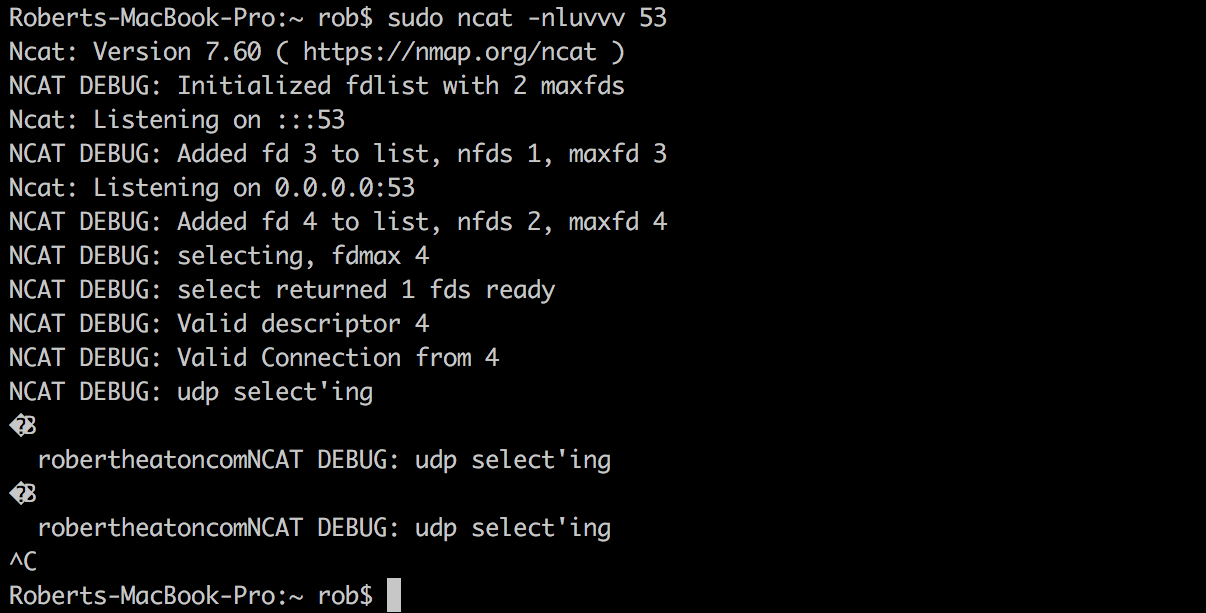
Netcat is a tool for reading and writing data on TCP and UDP network connections. As we have seen, your smartphone sends DNS requests over UDP on port 53. To listen for these requests using netcat, run:
sudo ncat -nluvvv 53
in a terminal. This command needs to be run as sudo because it is listening on a low-numbered, sensitive port.
Now when you try to visit a website on your smartphone, you should see a DNS request printed out on your laptop’s terminal. Since the request is not designed for easy human reading, it will mostly look like garbled nonsense. However, you should still be able to make out the hostname of the website you are trying to visit, somewhere amidst the gibberish.
You may need to stop and start the ncat listener a few times in order to get this to work. If you still can’t get it functioning, then as long as the packets from your smartphone appeared in Wireshark you don’t need to worry.
We have now inspected your smartphone’s DNS requests using both Wireshark and Netcat. However, your laptop still doesn’t know how to respond to them. It won’t send a DNS response back to your smartphone, and so your smartphone still won’t be able to actually load the page you are trying to visit. Let’s fix this and send back a DNS response, using one of netcat’s fancier options.
1.3 Using Netcat to send back a DNS response
ncat UDP listeners have a --exec option. You can use --exec to specify a command that netcat should run whenever a UDP listener receives a packet. Netcat feeds the contents of the packet into the command specific by --exec, on stdin, and sends back to the packet’s original sender any output that the command writes to stdout. For example, in order to run a Python script whenever your listener receives a UDP packet, you would run:
Let’s use --exec to respond to to your smartphone’s DNS requests. Save the following Python script onto your laptop.
importsys# Read the first 2 bytes from the DNS request that netcat
# is piping in on stdin. These byte are the request ID and
# must be included at the start of the response so that the
# requester can match the response up with its original request
req_id=sys.stdin.read(2)# Convert the bytes to hex
req_id_hex_str=''.join(["%02X"%ord(c)forcinstr(req_id)])# This is hex for the DNS response body "robertheaton.com
# is at IP address 104.18.32.191". To give yourself some
# confidence that I'm telling the truth, run:
#
# python -c "print bytearray.fromhex('$COPY_THE_HEX_STRING_HERE')"
#
# in a terminal.
resp_body_str="818000010002000000000c726f62657274686561746f6e03636f6d0000010001c00c000100010000012b0004681220bfc00c000100010000012b0004681221bf"# Construct a DNS response, convert it to bytes, and write
# it to stdout so that netcat's --exec option sends it back
# to your smartphone
full_resp_body_bytes=bytearray.fromhex(req_id_hex_str+resp_body_str)sys.stdout.write(full_resp_body_bytes)
This script outputs to stdout a hard-coded, pre-generated DNS response that I copied and pasted from Wireshark. This hard-coded response tells the requester (your smartphone) that robertheaton.com resolves to the IP address 104.18.32.191. To ensure that the requester can match our response to its original request, the script reads the first 2 bytes of the request (which signify the DNS request ID), and prepends them to the main response body. The is necessary because UDP is a connectionless protocol, and does not provide your smartphone with any built-in way to match up DNS responses with requests.
You should verify that the DNS response hex string really is doing what I claim it is. It could easily be telling your smartphone that apple.com resolves to a suspicious server located in Russia and owned by a Bahamian shell company (nb. I promise that it is not) (nnb. if it actually is then I have been compromised, please send help). You can confirm that the response is innocuous by running the following command in a terminal:
Even better, copy the hex code of one of your own DNS requests from Wireshark and use that in the script instead.
You should also check that you trust the rest of the script. If you run ncat as root using sudo, then this Python script will run as root too, with all the associated privileges. Don’t be unduly concerned though - I promise that it’s all completely benign and legit.
To use the script to send a DNS response back to your phone, make sure that your smartphone’s DNS server is still set to be your laptop and run:
Now visit a website other thanrobertheaton.com (or the hostname in the response that you copied from Wireshark) on your smartphone - you should find that it still does not work. This is because your smartphone asked your laptop a question like “what is the IP address of facebook.com?”, and your laptop sent back the non sequitur response “robertheaton.com is at IP address 104.18.32.191”. Since the request and response hostnames don’t match up, your smartphone ignores the response altogether.
The sole hostname that our crude DNS server will work for is none other than the most important website on the internet, robertheaton.com. Visit robertheaton.com on your smartphone and you should see it load as normal, in all its striking yet understated glory. This is because “robertheaton.com is at IP address 104.18.32.191” is only a useful answer when the question is “what is the IP address of robertheaton.com?”
2. Making the real DNS server
With the DNS spoofing concept proven, we are now ready to build and run our full, fake DNS server. I’ve written us such a server using a short Python script and the powerful networking library scapy. Once again, this script needs to be run using sudo in order to allow it to listen on port 53. Copy the script onto your laptop and run it using:
importdns.resolverimportscapy.allasscapyimportnetifacesasnidefhandle_packet_fn(iface,spoof_ip,spoof_domains):defhandle_packet(packet):ip=packet.getlayer(scapy.IP)udp=packet.getlayer(scapy.UDP)# Ignore packets containing data we aren't interested
# in.
ifhasattr(packet,'qd')andpacket.qdisnotNone:queried_host=packet.qd.qname[:-1].decode("utf-8")ifqueried_hostisNone:print("queried_host is None, dropping request")return# If the queried_host is one of the domains we want
# to spoof, return the spoof_ip.
ifqueried_hostinspoof_domains:print("!!!! Spoofing DNS request for %s by %s !!!!"%(queried_host,ip.src))resolved_ip=spoof_ip# Else use dns.resolver to make a real DNS "A record"
# request, and return the result of that.
else:print("Forwarding DNS request for %s by %s"%(queried_host,ip.src))a_records=dns.resolver.query(queried_host,'A')resolved_ip=a_records[0].address# Build the DNS answer
dns_answer=scapy.DNSRR(rrname=queried_host+".",ttl=330,type="A",rclass="IN",rdata=resolved_ip)# Build the DNS response by constructing the IP
# packet, the UDP "datagram" that goes inside the
# packet, and finally the DNS response that goes
# inside the datagram.
dns_response= \
scapy.IP(src=ip.dst,dst=ip.src)/ \
scapy.UDP(sport=udp.dport,dport=udp.sport)/ \
scapy.DNS(id=packet[scapy.DNS].id,qr=1,aa=0,rcode=0,qd=packet.qd,an=dns_answer)print("Resolved DNS request for %s to %s for %s"%(queried_host,resolved_ip,ip.src))# Use scapy to send our response back to your phone.
scapy.send(dns_response,iface=iface)else:print("Ignoring unrecognized packet from %s"%ip.src)returnhandle_packetdef_get_local_ip(iface):ni.ifaddresses(iface)returnni.ifaddresses(iface)[ni.AF_INET][0]['addr']defrun(iface,local_ip,sniff_filter,spoof_domains):print("#-#-#-#-#-#-#-#-#-#-#-#-#-#-#-#-#-#-#-#-#")print("-#-#-#-#-#-RUNNING DNS SPOOFER-#-#-#-#-#-")print("#-#-#-#-#-#-#-#-#-#-#-#-#-#-#-#-#-#-#-#-#")print("Interface:\t\t\t%s"%iface)print("Resolving to IP:\t\t%s"%local_ip)print("Spoof domains:\t\t%s"%', '.join(spoof_domains))print("BPF sniff filter:\t\t%s"%sniff_filter)print("")print("Waiting for DNS requests...")print("(Make sure the device you are targeting is set to use"\
"your local IP (%s) as its DNS server)"%local_ip)scapy.sniff(iface=iface,filter=sniff_filter,prn=handle_packet_fn(iface,local_ip,spoof_domains))IFACE='en0'local_ip=_get_local_ip(IFACE)# The local IP of your phone
client_ip='192.168.42.74'SPOOF_DOMAINS=['nonhttps.com','www.nonhttps.com']SNIFF_FILTER=("udp port 53 && dst %s && src %s"%(local_ip,client_ip))run(IFACE,local_ip,SNIFF_FILTER,SPOOF_DOMAINS)
Once you have started the DNS server, make sure that your smartphone’s DNS server is still set to be your laptop, as above. Visit a few websites on your smartphone and look back at your terminal - you should see DNS requests coming in from your smartphone and being logged by our DNS server.
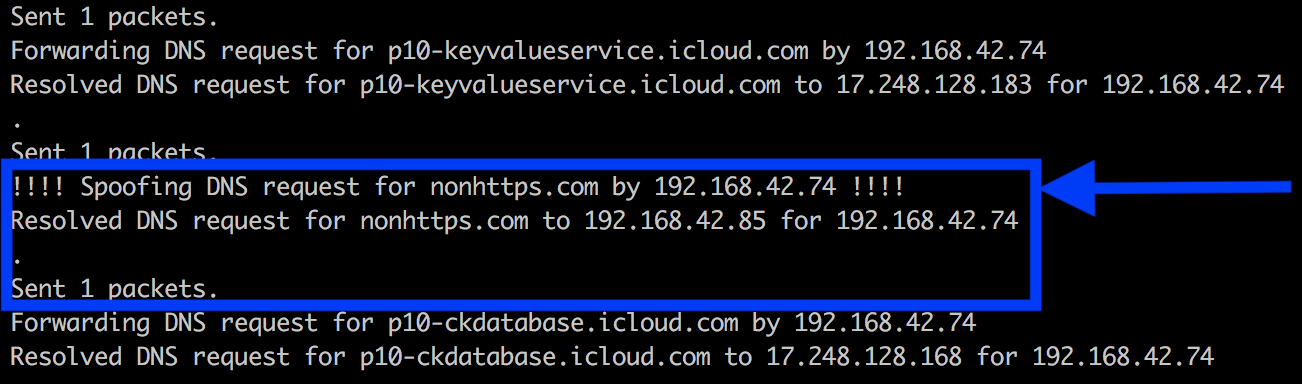
The behavior of our server depends on the hostname that the DNS request is for. If the request is for our target hostname (currently set in the script to be nonhttps.com, because we don’t want to have to worry about HTTPS yet), our server responds with your laptop’s local IP address. For all others, it makes its own real DNS request to a real DNS server, and uses the real answer to respond to your smartphone with the truth.
This means that your phone can now use our fake DNS server to accurately resolve hostnames to IP addresses, for all hostnames other than our target. Its internet should have just come back up, apart from for our current target, nonhttps.com.
Let’s confirm this. Visit nonhttps.com on your smartphone. You should see our DNS server log that it has spoofed the DNS response, and has returned the local IP address of your laptop.
Your smartphone should then attempt to send its HTTP request for nonhttps.com to your laptop, instead of the real nonhttps.com servers. The page should fail to load. Once again, I promise that this is fantastic progress.
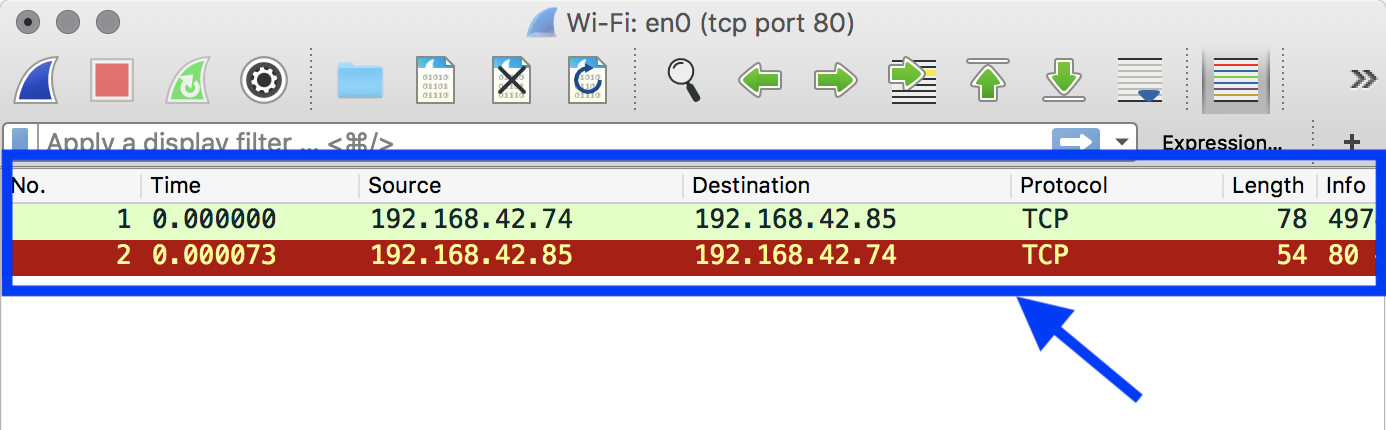
Let’s use Wireshark to confirm that this is actually what just happened. Run Wireshark with the packet filter tcp port 80 && dst $YOUR_LAPTOPS_LOCAL_IP. Reload nonhttps.com on your smartphone, and look back at Wireshark. You should see your smartphone attempt to connect to your laptop over TCP on port 80. The TCP connection’s “destination IP” should be set to your laptop’s local IP, and its “source IP” should be set to your smartphone’s IP. This proves that we have successfully convinced your smartphone to send its TCP requests for nonhttps.com to your laptop!
3. A closer look at the code
Now that our DNS server is working, let’s take a closer look at its code. You may find it useful to open the code in GitHub.
Our server watches all of the packets going through your laptop’s wi-fi interface, and runs a callback function on those that look like DNS requests. The callback function builds a DNS response, and sends it back to your smartphone.
Our server is built using scapy, a Python networking library. We pick out DNS traffic by passing scapy a filter expression (udp port 53 && dst $YOUR_LAPTOPS_LOCAL_IP && src $YOUR_PHONES_LOCAL_IP). Whenever scapy sees a packet that matches this filter, it runs our callback function on it. This callback constructs and sends a DNS response back to your smartphone. As described in the previous section, the response contains either your laptop’s local IP address, or the real IP address of the requested domain.
The DNS response must also contain the correct hostname and DNS request ID, so that your smartphone can match the response to its original request. As we saw in our experiments with netcat, getting these fields wrong causes your smartphone to ignore our DNS response. Unlike our primitive netcat script, our DNS server dynamically reads the hostname and request ID off of the DNS request, and sets them correctly in the response.
Finally, not only do we have to manually construct our DNS response from scratch, we also have to construct the IP packet that will transport it. In particular, we need to specify the IP packet’s source and destination IP addresses, to make sure that it gets routed safely to your smartphone. We do this by setting the response IP packet’s source to be the request IP packet’s destination, and vice-versa.
4. Conclusion
In this section of our TCP proxy project, we configured your smartphone to send its DNS requests to your laptop. We built a fake DNS server that enabled your laptop to respond to these DNS requests with spoofed responses. If a DNS request was about our target hostname, our server responded with your laptop’s local IP address. If it was not, our server responded with the truth.
This meant that your smartphone started trying to make TCP connections that it had intended to make with our target app with your laptop instead. It continued functioning as normal for all other hostnames.
In the next 2 sections, we will build a TCP server that runs on your laptop and listens for these incoming TCP connections from your smartphone. This server will print out and save the contents of these requests, forward them to their intended destination, and handle TLS encryption and decryption. Then we’ll have the generic TCP proxy that we’ve always dreamed of.