This is the final part of a 4-part project to build a generic TCP proxy. This proxy will be capable of handling any TCP-based protocol, not just HTTP.
In part 3 we finished building a basic TCP proxy that can handle unencrypted protocols. We used this proxy to intercept and inspect plaintext HTTP requests sent by your phone, and it worked beautifully.
However, our proxy is still unable to handle encryption, including TLS, the most common form of encryption on the internet. Any app on your phone that demands a TLS-encrypted connection, like a mobile browser connecting to an HTTPS-only website, will refuse to do business with our proxy. We need to show our proxy how to negotiate a TLS connection.
In this final part of the project, we’re going to build a fake Certificate Authority. This will help us convince your phone that it should trust our proxy, and help our proxy establish TLS connections with your phone.
Let’s start by seeing for ourselves what goes wrong when our basic proxy from part 3 is asked for an encrypted connection.
0. What goes wrong
Let’s try to send an HTTPS request through our basic proxy. Change the target hostname in our fake DNS server from part 2 to google.com. Change the hostname in our proxy from part 3 to google.com as well, and set the port that it listens and sends on to 443 (by convention, the HTTPS port). Set your phone’s DNS server to be your laptop’s local IP address (as in parts 2 and 3), then start up both our DNS server and TCP proxy.
Visit google.com on your phone. When we performed this trick in part 3 with nonhttps.com, the heist went off without a hitch. Your phone’s browser sent its unencrypted request for nonhttps.com to our proxy, no questions asked, and our proxy forwarded this request to nonhttps.com itself.
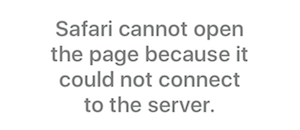
However, Google very sensibly insists on being served over HTTPS. When your phone’s browser finds out that our proxy doesn’t know how to negotiate a TLS connection, it will immediately give up and close its TCP connection with it. The browser will display an error.
Let’s solve this problem. Let’s teach our proxy to speak TLS.
(If you haven’t come across TLS before or would like a refresher, have a read of my introduction to HTTPS)
1. Teaching our proxy TLS
Let’s start by working out the list of challenges that we’ll need to solve. We’ll begin with the current state of our proxy, and work backwards. This will help us see exactly why each step is necessary, and what would happen if we left it out.
1.1 Listen, SSL
We’ll need to reprogram our proxy a little.
In our code from part 3, our proxy listened for incoming TCP connections from your phone using the listenTCP method of the twisted Python networking library. twisted has another method called listenSSL. listenSSL and listenTCP both watch and wait for incoming TCP connections, and are conceptually quite similar.
Where these methods differ is in how they proceed after they have established a TCP connection with a client. listenTCP immediately starts accepting application-layer data (like an unencrypted HTTP request). However, before listenSSL accepts any application-layer data, it first attempts to perform a TLS handshake with the client. Only once this handshake has been successfully completed does listenSSL start accepting (now encrypted) application-layer data.
In order to teach our proxy TLS, we’re going to need to use listenSSL instead of listenTCP. But there’s more to this than just adding SSL to the end of our method call and declaring victory.
1.2 Generating TLS certificates
listenSSL handles the low-level, algorithmic mechanics of TLS handshakes and decryption for us. But in order to do this, it needs to be passed an object representing a TLS certificate and private key as one of its arguments. As we will see, these are easy enough for us to create, but harder for us to get right.
Servers use TLS certificates to prove their identity. When a client (like your phone) asks a server (like our proxy) to perform a TLS handshake, the server starts by presenting the client with its TLS certificate. Your phone will refuse to do a TLS handshake with our proxy unless this certificate’s Common Name (a field in the certificate) matches the hostname that your phone believes it is talking to. We will therefore need to be able to generate and use our own TLS certificates, with their Common Names set to the hostname of our target app (like api.targetapp.com).
This might sound strange at first. The whole point of TLS is that when a server presents a client with a certificate for api.targetapp.com, the client can be quite certain that it is talking to the real TargetApp and not some dastardly man-in-the-middle. I wouldn’t describe us as dastardly exactly, but if we can generate a certificate for api.targetapp.com from the comfort of our own home then surely this can’t bode well for the security of TLS?
1.3 Signing TLS certificates
However, clients like your phone check more than a certificate’s Common Name when verifying its validity. They also check its “cryptographic signature”. A cryptographic signature is a seal of approval attached to a certificate by some third party, usually a “Certificate Authority” (CA). CAs are secure and trustworthy organizations whose job it is to issue and sign TLS certificates. It is no exaggeration to say that they are collectively responsible for the integrity of encryption on the internet. Before issuing one of its customer with a certificate for a domain or hostname, a CA does due diligence to verify that the customer is indeed the property’s real owner.
Once the CA is satisfied, it generates a certificate (and private key) for the hostname, and appends a cryptographic signature to the certificate. The CA creates the signature by using its own private key to encrypt the certificate’s contents. A client can verify that the signature is valid by decrypting the signature using the CA’s public key, and confirming that the decrypted text matches the text of the certificate. Since the signature could not have been generated without access to the CA’s private key - which they keep extremely secret and secure - it is safe to assume that the CA endorses the contents of the certificate. They have been satisfied that the bearer of the certificate (or more accurately, the organization in possession of the corresponding private key) is the true owner of the domain or hostname that it contains. The signature effectively represents a statement like “I, Verisign (for example), assert that this certificate (and the corresponding private key) belongs to the true owner of api.targetapp.com”.
Clients like your phone only trust TLS certificates that have been signed by a CA that they trust. Your phone decides which CAs to trust using a hard-coded list of root CAs that have been approved by your phone’s manufacturer. For example, the list of root CAs pre-loaded into iOS11 is available online.
We can generate a DIY certificate for api.targetapp.com, no problem. But since we are not the true owners of api.targetapp.com (at least I’m not, I can’t speak for you), we will never be able to convince a real, trusted CAs to sign it. And if none of them will vouch for our certificate, your phone will refuse to trust it.
We can fix this problem by starting our own root CA called “Robert’s Trusty Certificate Corp” and getting it onto your smartphone’s list of trusted root CAs. One extremely difficult way of doing this would be to set up an actual company, hire a few hundred people to run it, build some extremely secure certificate generation infrastructure, fill in a large amount of paperwork to convince Google and Apple and the rest that we should be entrusted with the online security of hundreds of millions of people, and eventually get our CA’s public key included in your phone’s next OS update. Afterwards you can either continue to work on this TCP proxy project; run your fledgling infrastructure business; or turn rogue and try to empty the bank accounts of everyone in the entire world. The details are left as an exercise for the reader.
Since this all sounds like a lot of work, we’ll do something easier. We’ll still generate a root CA certificate for Robert’s Trusty Certificate Corp. Then, rather than going through all the above rigmarole, we will manually add this certificate to your phone’s list of trusted root CAs. This tells your phone to trust other certificates that are signed by Robert’s Trusty Certificate Corp. We’ll use RTCC’s private key to sign our api.targetapp.com certificate, and pass this signed certificate and its private key into our proxy’s listenSSL method.
When our proxy presents your phone with its freshly signed api.targetapp.com certificate, your phone will see that it is signed by “Robert’s Trusty Certificate Corp”. It will check its internal list of trusted CAs and see that this splendid and reputable outfit is on there. It will happily accept our certificate for api.targetapp.com as valid, and continue negotiating a TLS session before beginning to send its TCP traffic.
Note that anyone who got hold of our homemade CA’s private key would be able to use it to sign their own certificates for any hostname they wanted. In the eyes of your phone (and your phone only), these certificates would be legitimate and trustworthy. An attacker would be able to use them to perform their own man-in-the-middle attack against you, allowing them to read your encrypted traffic. You should be careful to keep your CA’s private key extremely safe. You should also be sure to remove your CA’s public key from your phone’s list of root CAs as soon as you are done with this project.
Once we have generated a TLS certificate that your phone will trust, we can pass it into our proxy via listenSSL. twisted will handle the rest for us, and our proxy will then be TLS-enabled.
2. Implementation
In order to teach our TLS proxy about TLS, we will need to:
Generate a TLS certificate and private key for our target app’s hostname
Generate a root CA public/private key pair and use the private key to sign this TLS certificate
Install our root CA’s public key as one of the trusted authorities on your phone
Pass this certificate and the corresponding private key into twisted’s listenSSL function, and use listenSSL to listen for incoming TCP connections
For reasons that will become clear later, we’re going to test our proxy against www.bbc.com, the website of the British Broadcasting Corporation.
This won’t hurt a bit.
2.1 Generating a certificate for our target hostname
Libraries for creating and signing TLS certificates are available in most sensible programming languages. It only takes a few lines of code to generate our first certificate for bbc.com.
2.2 Generating a certificate for our Certificate Authority
We’ll generate a second TLS certificate for “Robert’s Trusty Certificate Corp”, our homemade root CA. This certificate will be self-signed - signed using the certificate’s own private key. This is because a root CA is trusted implicitly, and doesn’t need anyone else to vouch for it.
2.3 Signing our target’s certificate
Now we can sign our certificate for www.bbc.com using our new CA’s private key. This signature will cryptographically encode the statement “Robert’s Trusty Certificate Corp asserts that this certificate belongs to the true owner of www.bbc.com”.
2.4 Installing the Root CA’s cert on your phone
Finally, we’ll need to install our root CA on your phone so that your phone will trust other certificates that are signed by it. The safest way to do this is to:
Run the proxy server script below once. It will generate a root CA certificate and print out its location
Open the certificate file and copy the second half - everything including and after -----BEGIN CERTIFICATE----- - into a new file called ca.pub
Email ca.pub as a file attachement to an email account that you can access on your phone
Open the email on your phone and open the attachment
The remaining steps will depend on the make and model of your phone. For example, on iOS you have to install the key as a root CA, then find it in your system settings and enable it, ticking various “yes I’m aware that this is quite a risky thing to be doing” boxes along the way
There are fancier and less manual ways to install our root CA’s certificate on your phone, but these steps will get you there.
2.5 Listen, SSL
We now have everything we need for a TLS-enabled, man-in-the-middle, TCP proxy. We will update our proxy’s startup script so that it generates and signs its own certificate for the target hostname (in our testing, this will be www.bbc.com). We will then pass the signed certificate into our proxy, and start our proxy up.
importtimefromtwisted.internetimportprotocol,reactorfromtwisted.internetimportsslastwisted_sslimportdns.resolverfromOpenSSL.cryptoimport(X509Extension,X509,dump_privatekey,dump_certificate,load_certificate,load_privatekey,PKey,TYPE_RSA,X509Req)fromOpenSSL.SSLimportFILETYPE_PEMimporttempfileimportosimportnetifacesasni# Adapted from http://stackoverflow.com/a/15645169/221061
classTLSTCPProxyProtocol(protocol.Protocol):"""
TLSTCPProxyProtocol listens for TCP connections from a
client (eg. a phone) and forwards them on to a specified
destination (eg. an app's API server) over a second TCP
connection, using a ProxyToServerProtocol.
It assumes that both legs of this trip are encrypted
using TLS.
"""def__init__(self):self.buffer=Noneself.proxy_to_server_protocol=NonedefconnectionMade(self):"""
Called by twisted when a client connects to the
proxy. Makes an TLS connection from the proxy to
the server to complete the chain.
"""print("Connection made from CLIENT => PROXY")proxy_to_server_factory=protocol.ClientFactory()proxy_to_server_factory.protocol=ProxyToServerProtocolproxy_to_server_factory.server=selfreactor.connectSSL(DST_IP,DST_PORT,proxy_to_server_factory,twisted_ssl.CertificateOptions())defdataReceived(self,data):"""
Called by twisted when the proxy receives data from
the client. Sends the data on to the server.
CLIENT ===> PROXY ===> DST
"""print("")print("CLIENT => SERVER")print(FORMAT_FN(data))WRITE_TO_FILE(data)print("")ifself.proxy_to_server_protocol:self.proxy_to_server_protocol.write(data)else:self.buffer=datadefwrite(self,data):self.transport.write(data)classProxyToServerProtocol(protocol.Protocol):"""
ProxyToServerProtocol connects to a server over TCP.
It sends the server data given to it by an
TLSTCPProxyProtocol, and uses the TLSTCPProxyProtocol
to send data that it receives back from the server on
to a client.
"""defconnectionMade(self):"""
Called by twisted when the proxy connects to the
server. Flushes any buffered data on the proxy
to server.
"""print("Connection made from PROXY => SERVER")self.factory.server.proxy_to_server_protocol=selfself.write(self.factory.server.buffer)self.factory.server.buffer=''defdataReceived(self,data):"""
Called by twisted when the proxy receives data
from the server. Sends the data on to to the
client.
DST ===> PROXY ===> CLIENT
"""print("")print("SERVER => CLIENT")print(FORMAT_FN(data))print("")self.factory.server.write(data)defwrite(self,data):ifdata:self.transport.write(data)# A class that represents a CA. It wraps a root CA TLS
# certificate, and can generate and sign certificates using
# this root cert.
#
# Inpsiration from
# https://github.com/allfro/pymiproxy/blob/master/src/miproxy/proxy.py
classCertificateAuthority(object):CERT_PREFIX='fake-cert'def__init__(self,ca_file,cache_dir=tempfile.mkdtemp()):print("Initializing CertificateAuthority ca_file=%s cache_dir=%s"%(ca_file,cache_dir))self.ca_file=ca_fileself.cache_dir=cache_dirifnotos.path.exists(ca_file):raiseException("No cert exists at %s"%ca_file)else:self._read_ca(ca_file)defget_cert_path(self,cn):cnp=os.path.sep.join([self.cache_dir,'%s-%s.pem'%(self.CERT_PREFIX,cn)])ifos.path.exists(cnp):print("Cert already exists common_name=%s"%cn)else:print("Creating and signing cert common_name=%s"%cn)key=PKey()key.generate_key(TYPE_RSA,2048)# Generate CSR
req=X509Req()req.get_subject().CN=cnreq.set_pubkey(key)req.sign(key,'sha1')# Sign CSR
cert=X509()cert.set_subject(req.get_subject())cert.set_serial_number(123)cert.gmtime_adj_notBefore(0)cert.gmtime_adj_notAfter(31536000)cert.set_issuer(self.cert.get_subject())cert.set_pubkey(req.get_pubkey())cert.sign(self.key,'sha1')withopen(cnp,'wb+')asf:f.write(dump_privatekey(FILETYPE_PEM,key))f.write(dump_certificate(FILETYPE_PEM,cert))print("Created cert common_name=%s location=%s"%(cn,cnp))returncnpdef_read_ca(self,file):self.cert=load_certificate(FILETYPE_PEM,open(file).read())self.key=load_privatekey(FILETYPE_PEM,open(file).read())@staticmethoddefgenerate_ca_cert(path,common_name):ifos.path.exists(path):print("Cert already exists at %s, not regenerating"%path)return# Generate key
key=PKey()key.generate_key(TYPE_RSA,2048)# Generate certificate
cert=X509()cert.set_version(3)cert.set_serial_number(1)cert.get_subject().CN=common_namecert.gmtime_adj_notBefore(0)cert.gmtime_adj_notAfter(315360000)cert.set_issuer(cert.get_subject())cert.set_pubkey(key)cert.sign(key,"sha256")withopen(path,'wb+')asf:f.write(dump_privatekey(FILETYPE_PEM,key))f.write(dump_certificate(FILETYPE_PEM,cert))defget_local_ip(iface):ni.ifaddresses(iface)returnni.ifaddresses(iface)[ni.AF_INET][0]['addr']# Alternative functions for formating output data
def_side_by_side_hex(data):BLOCK_SIZE=16output_lines=[]foriinrange(0,len(data),BLOCK_SIZE):block=data[i:i+BLOCK_SIZE]_hex=["%.2x"%elforelinblock]_str=[chr(el)ifchr(el).isprintable()else"."forelinblock]line=" ".join(_hex).ljust((3*BLOCK_SIZE)+4)+"".join(_str).replace("\n",".")output_lines.append(line)return"\n".join(output_lines)def_stacked_hex(data):BLOCK_SIZE=32hex_lines=[]plaintext_lines=[]foriinrange(0,len(data),BLOCK_SIZE):block=data[i:i+BLOCK_SIZE]_hex=["%.2x"%elforelinblock]_str=[chr(el)ifchr(el).isprintable()else"."forelinblock]hex_line=" ".join(_hex)hex_lines.append(hex_line)plaintext_line=" ".join(_str).replace("\n",".")plaintext_lines.append(plaintext_line)lines=hex_lines+["\n"]+plaintext_linesreturn"\n".join(lines)def_replayable(data):d=data[0:4000]_hex="".join(["%.2x"%elforelind])_str="".join([chr(el)ifchr(el).isprintable()else"."forelind])return_hex+"\n"+_strdef_noop(data):returndata# Change this line to use an alternative formating function
FORMAT_FN=_noop# Record data sent to the server to files
DIR_NAME="replays/messages-%d/"%time.time()os.mkdir(DIR_NAME)f_n=0def_write_to_file(data):# Global variables are bad but they do the job
globalf_nwithopen(DIR_NAME+str(f_n),'wb')asf:f.write(data)f_n+=1WRITE_TO_FILE=_write_to_fileCA_CERT_PATH="./ca-cert.pem"LISTEN_PORT=443DST_PORT=443DST_HOST="www.bbc.com"local_ip=get_local_ip('en0')print("Querying DNS records for %s..."%DST_HOST)a_records=dns.resolver.query(DST_HOST,'A')print("Found %d A records:"%len(a_records))forrina_records:print("* %s"%r.address)print("")assert(len(a_records)>0)DST_IP=a_records[0].addressprint("Choosing to proxy to %s"%DST_IP)print("""
#-#-#-#-#-#-#-#-#-#-#-#-#-#-#-#-#-#-#-#-#-#
-#-#-#-#-#-RUNNING TLS TCP PROXY-#-#-#-#-#-
#-#-#-#-#-#-#-#-#-#-#-#-#-#-#-#-#-#-#-#-#-#
Root CA path:\t%s
Dst IP:\t%s
Dst port:\t%d
Dst hostname:\t%s
Listen port:\t%d
Local IP:\t%s
"""%(CA_CERT_PATH,DST_IP,DST_PORT,DST_HOST,LISTEN_PORT,local_ip))CertificateAuthority.generate_ca_cert(CA_CERT_PATH,"Robert's Trusty Certificate Corp")ca=CertificateAuthority(CA_CERT_PATH)certfile=ca.get_cert_path(DST_HOST)withopen(certfile)asf:cert=twisted_ssl.PrivateCertificate.loadPEM(f.read())print("""
Next steps:
1. Make sure you are spoofing DNS requests from the
device you are trying to proxy request from so that they
return your local IP (%s).
2. Make sure you have set the destination and listen
ports correctly (they should generally be the same).
3. Use the device you are proxying requests from to make
requests to %s and check that they are logged in this
terminal.
4. Look at the requests, write more code to replay them,
fiddle with them, etc.
Listening for requests on %s:%d...
"""%(local_ip,DST_HOST,local_ip,LISTEN_PORT))factory=protocol.ServerFactory()factory.protocol=TLSTCPProxyProtocolreactor.listenSSL(LISTEN_PORT,factory,cert.options(),interface=local_ip)reactor.run()
Why are we testing using the BBC?
As already mentioned, we’re going to test our proxy using www.bbc.com, the website of the British Broadcasting Corporation (BBC). This is because www.bbc.com uses HTTPS, but does not use compression on its response bodies.
Using a compression algorithm like gzip drastically reduces the size of the data that a server sends out. However, it also makes testing our proxy more difficult. Our proxy will only ever see compressed HTTP body data in its garbled, zipped-up state. Our proxy does not know how to uncompress the data, and so will not be able to show it to us in its real, human-readable form. But since the BBC does not compress its response bodies (as of August 2018), we can avoid this problem and only ever deal with fat, readable, non-compressed data.
Before you test out our TLS-enabled proxy, make sure that:
Your DNS spoofing script is set to spoof www.bbc.com
Your smartphone has its DNS server set to be your laptop’s IP address, like in part 2
Your TCP proxy script is pointing at www.bbc.com (the www is important!)
Your TCP proxy script is set to listen and send on port 443
Then start the DNS spoofing script, start the TCP proxy script, and visit www.bbc.com/news on your phone (the www.bbc.com homepage does not use HTTPS, so is no use to us here). You should see the unencrypted plaintext of your HTTP request and response appear in the logs of your proxy!
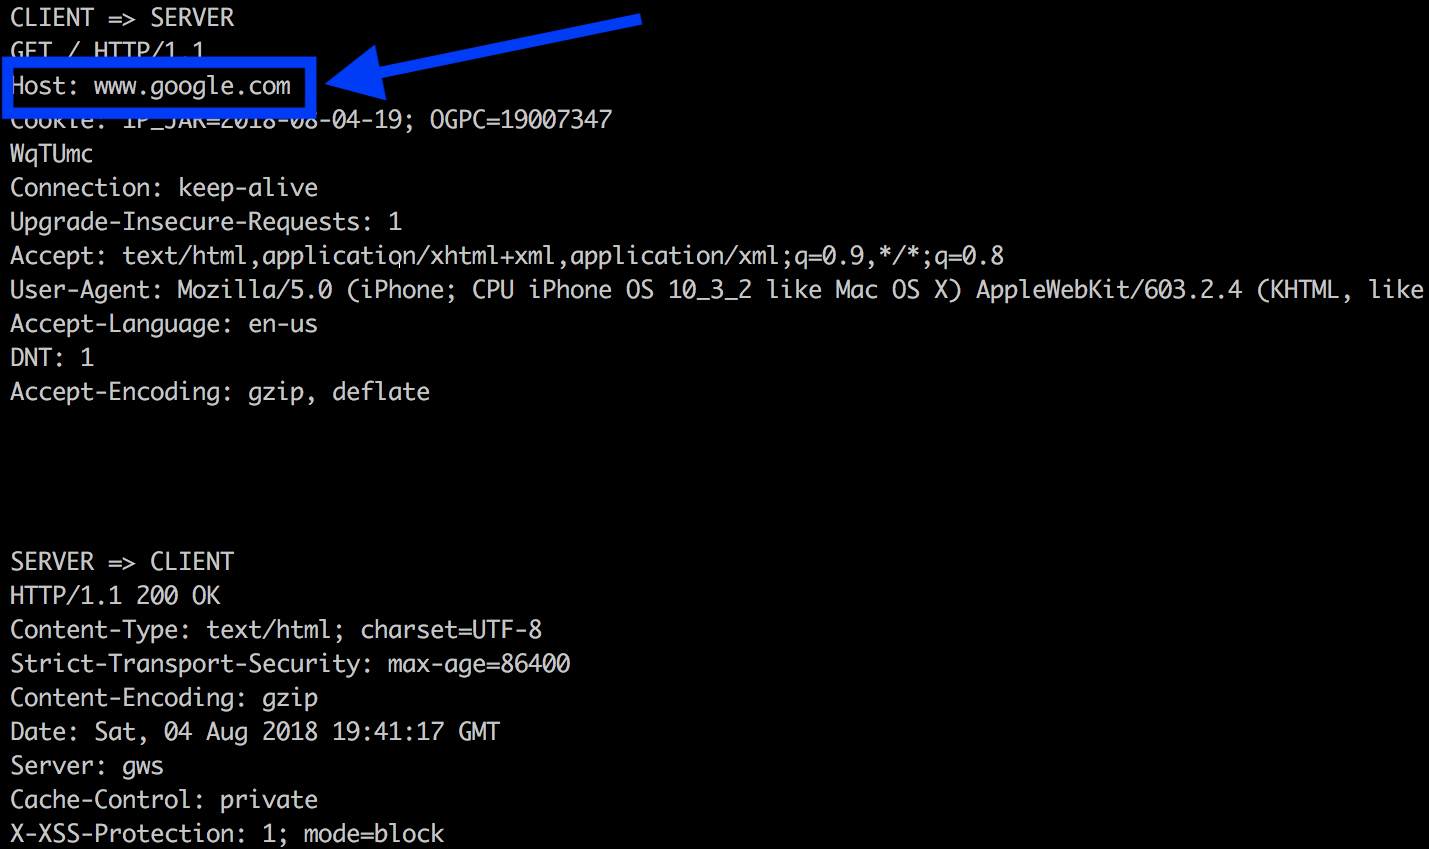
Once you’ve got this working, try it again with www.google.com. The HTTP response headers will still be readable, but since Google does use gzip compression, the response bodies will look like unintelligible nonsense.
That’s it. We’re done here.
3. Wrap up
It’s been an arduous and well-written journey, but you’re now able to proxy and inspect arbitrary TCP streams sent by your smartphone. Congratulations.
This was a much harder challenge than building a proxy that only handles for HTTP requests. Since we wanted to be able to proxy any TCP stream, not just HTTP requests, we couldn’t make use of any of your phone’s built-in HTTP proxy functionality. As we saw in part 1, if you want to proxy HTTP requests from your smartphone via your laptop, all you have to do is connect the devices to the same network, tell your phone’s proxy to use your laptop’s IP address as a proxy, start Burp Suite, and you’re immediately in business.
Life was much harder for us. We had to mess with the very fabric of how directions are given on the internet. We set up a fake DNS server, and used it to spoof the responses to your phone’s DNS requests sent by your phone. This tricked your phone into making TCP connections intended for the target hostname with your laptop instead. We built a proxy that received these connections and forwarded the data from them to our target’s server. It also forwarded any response data from the target’s server back to your smartphone, completing the loop. Your smartphone was none the wiser about what had happened.
We also added TLS support. We created our own, fake Certificate Authority and added its public key to your smartphone’s list of trusted CAs. We used its private key to sign TLS certificates that we had generated, and we used these certificates to negotiate TLS sessions between your phone and your laptop. When we were done we removed our CA’s public key from your phone’s list of trusted CAs (didn’t we?), because we are paranoid security experts and we don’t want to get man-in-the-middle-d for real.
4. Future work
Future work can be summarized as “make the TCP proxy more like Burp Suite”. It would be very useful to be able save the data that flows across your connections to a file or a database. It would also be handy to be able to replay these requests later. And it would be absolutely fantastic if we could edit them first.
Congratulations on completing your proxy. If you have any feedback on this project, both on what worked well and what could be improved, I’d love to hear it.