Programming Projects for Advanced Beginners #2: Game of Life
20 Jul 2018
This is a programming project for Advanced Beginners. If you’ve completed all the introductory tutorials and short exercises you can find, but are not sure how to continue developing your skills, this project is for you. It is structured and guided, whilst still leaving all of the difficult work to you. You can do it in whichever programming language you happen to be learning, and if you get stuck I’ll help you out over email, Twitter or Skype.
NEW
Subscribe to my new "Programming Feedback for Advanced Beginners"
newsletter to receive concise weekly emails containing specific,
real-world ways to make your code cleaner and more professional.
Each week I review code sent to me by one of my readers. I highlight
the things that I like, discuss the
things that I think could be better, and offer suggestions for how
the author could make their code cleaner and easier to work with.
Subscribe now to receive these invaluable improvements in your inbox
every week, completely free.
You’re going to build the famous and fascinating system known as “Conway’s Game of Life”. This will not be easy, but I guarantee that you will succeed. And once you’re finished you can create exquisite gifs of your work to share with your friends and extended family.
This is what it will look like
Throughout the course of the project, you will learn:
- How to structure large programs
- How to break down projects down into manageable chunks and milestones
- How to write automated tests so that your computer verifies that your code is correct for you
If you get stuck (defined as making zero progress for 30 minutes), you can get some inspiration from my example project. I’ve written it in Python, but I’ve also tried to avoid using any Python-specific constructs. It should therefore be a useful reference regardless of which language you are using. If your code looks different from mine, then as long as it works don’t worry! There are usually many different ways to solve the same problem.
If you get completely stuck (defined as making zero progress for 60 minutes), take a break and come back later with a clear mind. If you would like to, send me an email or a Tweet and I’ll do my level best to try and help you over the bump.
Let’s begin.
Introduction to Life
Game of Life (or just “Life”) is not really a game. There’s no winning or losing or destroying your opponent mentally and spiritually. Life is a “cellular automaton” - a system of cells that live on a grid, where they live, die and evolve according to the rules that govern their world.
Life’s simple, elegant rules give rise to astonishingly complex emergent behavior. It is played on a 2-D grid. Each square in the grid contains a cell, and each cell starts the game as either “alive” or “dead”. Play proceeds in rounds. During each round, each cell looks at its 8 immediate neighbors and counts up the number of them that are currently alive.
The cell then updates its own liveness according to 4 rules:
- Any live cell with 0 or 1 live neighbors becomes dead, because of underpopulation
- Any live cell with 2 or 3 live neighbors stays alive, because its neighborhood is just right
- Any live cell with more than 3 live neighbors becomes dead, because of overpopulation
- Any dead cell with exactly 3 live neighbors becomes alive, by reproduction
And that’s all there is to Life. These 4 rules give rise to some unbelievably complex and beautiful patterns, and an equally unbelievable quantity of analysis by Life devotees intent on discovering new ones. Here’s a Pulsar, an alien-like Life oscillator.

Here’s a Gosper Glider Gun, a pattern that shoots missiles across the world.
Here’s a Life Rube Goldberg Machine that is more technologically advanced than your phone.
And here’s a wonderful forum where adventurers search for more Life gold dust.
In this project we’re going to build a Game of Life that runs in your terminal. You’ll create your own Pulsars and Gosper Glider Guns, as well as Puffers, Lightweight Spaceships, and Toads. You’ll generate random worlds and watch them evolve. And you’ll tweak the rules of Life and see what happens. Maybe you’ll change the life and death thresholds, or add entirely new states (zombie cells that eat their neighbors?), or just turn the board rainbow-colored.
Sadly, changing the rules of Life does not allow you to change the rules of life. But it will make you a more experienced and proficient programmer.
Milestones
Big projects are easier to work on if you break them up into small, testable chunks. This allows you to focus on doing one, manageable thing at a time. You can then build your large, complex program out of simpler pieces that you have tested and that you trust. This isn’t cheating, it’s just good technique.
You wouldn’t try to build every part of an entire house all at once. You’d break it down and plan it out. You’d build the foundations, check that they work, build the walls, check that they work. At this point my knowledge of how to build an actual house breaks down, but I think that the principle is clear.
A good set of milestones for this project could be:
- Build a data structure to store the board state
- “Pretty-print” the board to the terminal
- Given a starting board state, calculate the next one
- Run the game forever
Then some extensions:
- Save interesting starting positions to files and add the ability to reload them into your Life
- Improve the User Interface
- Change the rules of Life
Milestones can even be broken down into smaller milestones. Say you’re trying to calculate the next board state. How about starting by simply calculating the next state of a single cell, and making absolutely sure that that works? Then, once you’ve the logic for a single cell worked out, you can start looking at how to apply this logic to every other cell as well. Once again, not cheating, just good technique. We’ll talk much more about milestones throughout the project.
1. Store the board state
The ultimate goal of the first milestone is to create a function called random_state. This function will take in 2 arguments - your board’s width and its height. It will return a board state in which every cell has been randomly initialized to either ALIVE (represented by a 1) or DEAD (represented by a 0). In Life these random patterns are known as “Soups”, and they are the quickest way for us to start producing interesting output.
The Life world is a 2-D grid. Regardless of language, 2-D grids are almost always represented in code using a list of lists:
board_state = [
    [1,1,1,1,1,1,1],
    [1,1,1,1,1,1,1],
    [1,1,1,1,1,1,1],
    [1,1,1,1,1,1,1],
    [1,0,1,1,1,1,1],
    [1,1,1,1,1,1,1]
]
You can then access the cells in the grid like this:
board_state[4][1]
board_state[4] accesses the 5th element of board_state, which in our example is the sub-list [1,0,1,1,1,1,1]. board_state[4][1] accesses the 2nd element of the 5th element of board_state, which has the value 0. This is very similar to the cartesian co-ordinate system that you may be familiar with already.
Let’s break this milestone down further. We are faced with at least 2 challenges - working out how to create a board of the right size, and working out how to randomly initialize each cell to either 0 or 1 (dead or alive). Let’s tackle these problems separately.
Even though we eventually want to write a random_state function, let’s start by writing a simpler dead_state function. Like random_state, dead_state will accept 2 arguments - a width and a height. It too will return a board, width by height in size. However, unlike random_state, every cell in this board will be initialized to 0. Give this a go. Use Google as much as you need to. Break it down into even smaller steps if that helps.
Test your program out by printing a dead state to the terminal. It will probably look quite ugly, but that’s OK.
width = 5
height = 5
print dead_state(width, height)
=> [[0,0,0,0,0], [0,0,0,0,0], .... # etc...
Once your dead_state function is working, you’ve already written half of random_state! You can use dead_state at the start of random_state to create the 2-D grid data-structure, and then all that’s left is to randomize the state of each cell.
def random_state(width, height):
    # Build the board using your previous work
    state = dead_state(width, height)

    # TODO: randomize each element of `state`
    # to either 0 or 1
A common way to randomize choices like this is to take advantage of your language’s built-in random number generator (RNG) library. You can use an RNG library to produce a random number between 0.0 and 1.0, and then pass this number through if-statements in order to decide whether your cell is dead or alive. For example, this code snippet initializes cell_state to 0 or 1, with a 50% probability of each.
random_number = random.random()
if random_number >= 0.5:
    cell_state = 0
else:
    cell_state = 1
Think about how the probabilities of setting the cell state to 0 or 1 would change if you adjusted the threshold in the if random_number >= 0.5: line. What would happen if you changed the threshold to 0.9? What about 0.05? Experiment with different values and see how they change the way your random board looks.
2. Pretty-print the board to the terminal
You can already print your board to your terminal using your language’s standard print function. But it probably doesn’t look like the lush, verdant world that I promised you a few paragraphs ago.
[[0, 1, 1, 0, 0, 0, 0, 1, 1, 1, 0, 0, 1, 0, 0, 1... # etc
In this milestone we’re going to write a render function. It will take 1 argument - a board state, just like those returned by the dead_state and random_state functions. The render function will format the board state and print it to the terminal.
-----------------
|# ### # ##   # |
|## ## ##    #  |
|## ###    #   #|
|etc...         |
You can use whatever characters (or even colors) you like to represent dead and live cells. As always, think about how you can break this task up into smaller pieces. Start by printing only the first row. How can you build on this to print the whole board?
Once you’ve got a render function that you believe works, double-check it by printing some of your states from the previous milestone.
a_dead_state = dead_state(20, 30)
render(a_dead_state)

a_random_state = random_state(20, 30)
render(a_random_state)
Make sure that they look reasonable. Are they the right height and width? Do they have roughly the number of alive and dead cells you would expect? You may need to zoom out on your terminal (using Ctrl+- or Cmd+-) in order to see the full width and height of the board.
3. Calculate the next state of the board
We’ve created the initial Life board and we’ve built the tools that we need to observe it. Now we’re ready to set it in motion. In this milestone we’re going to write a next_board_state function. It will take 1 argument - an initial board state. It will then use this argument to calculate and return the next board state, according to the rules of Life that we saw in the introduction:
- Any live cell with 0 or 1 live neighbors becomes dead, because of underpopulation
- Any live cell with 2 or 3 live neighbors stays alive, because its neighborhood is just right
- Any live cell with more than 3 live neighbors becomes dead, because of overpopulation
- Any dead cell with exactly 3 live neighbors becomes alive, by reproduction
Spend some time thinking about how to structure this milestone. What are the different challenges? Could you break them up into smaller pieces? Very roughly, how might your code look?
Below are 4 hints to help you get over some gotchas that might trip you up: testing, storing the new board state, iterating over the board, and dealing with cells on the edges. They’re there to help you if you get stuck, but if you don’t need them then don’t read them!
Once your next_board_state function passes all of your tests (see Hint 0) and looks sensible when you use render to print its results, you’re ready to go on to the final part of Life.
Hint 0 - Testing
The next_board_state function is much harder to test by eye than our previous functions. It was obvious when dead_state and render were working - could you see the board, and were all the cells dead? It’s much less clear whether every aspect of your next_board_state logic is correct. If you start with an initial board state of:
-------
|##  #|
| ##  |
| #  #|
|## # |
|#####|
-------
And get back a new board state of:
-------
|###  |
|  ## |
|   # |
|     |
|#  ##|
-------
Is this correct? It looks reasonable. But should that cell in the middle of the second row definitely be alive? What about the one on the right edge of the fifth row? We could recalculate every cell by hand and check that they match our program’s output, but that’s no way to spend your precious limited time on this earth.
The best and most systematic way to tackle this testing teaser is to write “unit tests”. Unit tests are small snippets of code that take your program for an automatic test drive. They programmatically verify that your functions return the right outputs when given certain inputs, and makes sure that they don’t throw any unexpected errors.
For example, here are some Life unit tests. The first test makes sure that dead cells with no live neighbors stay dead. The second makes sure that dead cells with exactly 3 live neighbors come alive:
from game_of_life import next_board_state

# TODO: there's a lot of repeated code here. Can
# you move some of into reusable functions to
# make it shorter and neater?

if __name__ == "__main__":
    # TEST 1: dead cells with no live neighbors
    # should stay dead.
    init_state1 = [
        [0,0,0],
        [0,0,0],
        [0,0,0]
    ]
    expected_next_state1 = [
        [0,0,0],
        [0,0,0],
        [0,0,0]
    ]
    actual_next_state1 = next_board_state(init_state1)

    if expected_next_state1 == actual_next_state1:
        print "PASSED 1"
    else:
        print "FAILED 1!"
        print "Expected:"
        print expected_next_state1
        print "Actual:"
        print actual_next_state1

    # TEST 2: dead cells with exactly 3 neighbors
    # should come alive.
    init_state2 = [
        [0,0,1],
        [0,1,1],
        [0,0,0]
    ]
    expected_next_state2 = [
        [0,1,1],
        [0,1,1],
        [0,0,0]
    ]
    actual_next_state2 = next_board_state(init_state2)

    if expected_next_state2 == actual_next_state2:
        print "PASSED 2"
    else:
        print "FAILED 2!"
        print "Expected:"
        print expected_next_state2
        print "Actual:"
        print actual_next_state2
If your next_board_state function is correct then these tests will print out PASSED 1, PASSED 2, etc. And if they discover a bug in next_board_state, they will fail and print the unexpected result. You can then update your code, re-run the tests, and verify that you fixed the bug without accidentally breaking something else.
Few people would claim that unit tests are the most exciting part of programming. Nonetheless, they are extremely important. They make your code more reliable, easier to work with, and much, much easier to verify. Of course, your tests are only as useful as you make them. The more tests you have, the fewer bugs will slip past you.
Copy the example tests above into a separate file, and import the necessary functions from your main program file. Now you have 2 programs that you can run. You have the main program that runs Life, and you have the test suite that checks that your main program is behaving itself. If you’re having trouble with cross-file imports, you can also just copy the unit tests into your main program file and comment them out when you don’t want to run them. This isn’t ideal, but it’s much better than throwing yourself out of a window because you can’t get your import statement to work.
Try writing some more test cases. How could you check that live cells die when they have more than 3 live neighbors? How could you make sure that everything works as expected for cells on the edges of the board and in the corners? If you ever manually find a bug that wasn’t caught by your test suite, add a test that would have caught it to make sure it never comes back.
Hint 1 - How to store the new state?
Your next_board_state function gets passed 1 argument - an initial_state. It is tempting to directly update this variable as you calculate the new state. However, this will quickly cause problems. Suppose that you are calculating the new state one row at a time, and are directly updating the initial_state variable using code like:
# !!!!!! DANGER DANGER! !!!!!!
# We've worked out that cell (x, y) should become
# dead. Let's update its value in `initial_state`.
# !!!!!! DANGER DANGER! !!!!!!
initial_state[x][y] = 0
Your initial_state variable now contains the new values of the current row, but still contains the old values of the next row! When you come to calculate the new state of the next row, you will be using the NEW liveness values of the current row. You’ve stomped over and lost the current row’s old values, which is what you should be using to calculate the new state of the next row. Your program won’t throw any errors, but it will give some very strange results.
A clean way around this problem is to begin next_board_state by initializing a new_state variable using your dead_state function.
new_state = dead_state(width, height)
Then when you calculate the next state of a cell, you update its value in new_state, leaving initial_state untouched and available for use in future calculations.
# We've worked out that cell (x, y) should become
# dead. Let's therefore update its value in
# `new_state` (this is fine!).
new_state[x][y] = 0
Hint 2 - Iterating over the board and calculating the number of live neighbors
You can iterate over every cell in the grid using a nested for-loop that might look something like:
for x in range(0, height):
  for y in range(0, width):
    current_cell_value = initial_state[x][y]

    # TODO: calculate the number of live
    # neighbors...
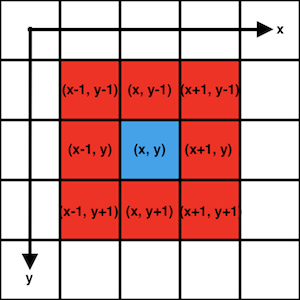
The neighbors of cell (x, y) are the cells that are 1 space either side of it, in any direction - initial_state[x-1][y-1], initial_state[x][y-1], initial_state[x+1][y-1], initial_state[x-1][y], and so on. How can you add up the number of these neighbors that are alive? How can you do it without having to write a new if-statement for every neighbor?
Hint 3 - Dealing with cells on the edges
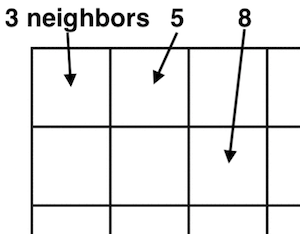
Cells in the centre of the board have 8 neighbors. However, cells on the edges have 5, and cells right in the corners have just 3.
Depending on which language you are using, you may run into problems if you accidentally try to access the minus-1th or 11th element of a 10 element array. You may see either Array Index Out of Bounds errors or odd, unexpected game behavior. I can think of 2 good ways to deal with this:
- Treat edge cells as having 5 neighbors, and corner cells as having 3. Add if-statements (
if x < 0...) to guard against the errors that are caused by trying to access elements that don’t exist.
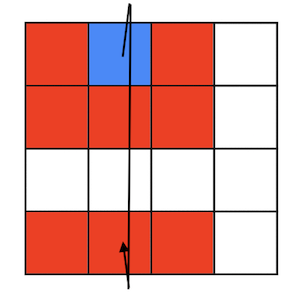
- Wrap the board round in a circle. Cells on the top and bottom edges count as each others’ neighbors, as do those on the left and right edges. This means that every cell has 8 neighbors.
4. Run Life forever
We know how to build the Life board. We know how to run a single round. All that remains is to make our system run forever.
It’s time for us to create eternal Life.
First we need to initialize our starting state. Second, we need to pass this state into our next_board_state function. Third and finally we need to run in an infinite loop, each time passing the previous result of next_board_state back into the next call of the function.
And after each iteration of our infinite loop, we need to use our render function to print the new board state to the terminal. This won’t overwrite the board state that was printed to your terminal in the last iteration - we’re simply appending more output. But each state will flash by so fast that it will look like a fancy, auto-updating UI.
Once you have this working, you will have built Life! Congratulations, that was not easy. Spend a few hours staring at its hypnotic beauty.
Final task - say hi!
If you’ve successfully made it this far then I’d love to know! I’m going to be making more advanced-beginner projects like this, and I’d like to understand how to make them as useful as possible. Please send me an email to tell me about your achievement. I’d love to hear from you. You can also sign up for my mailing list at the bottom of this page to find out when I publish more advanced-beginner projects. I’m planning on writing at least 1 per month.
NEW
Subscribe to my new "Programming Feedback for Advanced Beginners"
newsletter to receive concise weekly emails containing specific,
real-world ways to make your code cleaner and more professional.
Each week I review code sent to me by one of my readers. I highlight
the things that I like, discuss the
things that I think could be better, and offer suggestions for how
the author could make their code cleaner and easier to work with.
Subscribe now to receive these invaluable improvements in your inbox
every week, completely free.
Once you’ve sent me that quick message, it’s time to move on to Life’s extensions.
5. Load from a file
We’re in the big leagues now, so you’re going to get even fewer pointers than before.
So far we’ve been running “soups”. A soup is a random Life pattern that (usually) explodes in a burst of pixellated fireworks and then gradually fades out. But if all we do is make random soups, we’ll never get to see any of intricate patterns carefully designed and discovered by generations of Life devotees. In this extension exercise, you’re going to write the initial states of patterns into text files, load them into your program, and use them to create intelligently designed Life.
Let’s start by making a Toad.

Open a new file named toad.txt in the same directory as your program. We’ll use this file to store a Toad. We’ll encode Life states in the file using a grid of 0s and 1s - 0 to represent dead cells, and 1 for live ones. For example, here’s our Toad:
000000
000000
001110
011100
000000
000000
Copy these 0s and 1s into your toad.txt file. Write code to load the Toad into your Life and run it. This might look something like:
# You'll have to write the `load_board_state`
# function yourself!
initial_state = load_board_state("./toad.txt")

# Now run your Life using your previous code,
# starting from this initial_state
When you run your program a Toad should appear, peacefully flip-flopping in the middle of your screen. Make and run files for other patterns, like the Beacon, the Blinker, and the Glider.


Then, when you’re ready, make a Gosper Glider Gun.
Here’s a schematic of the initial state:
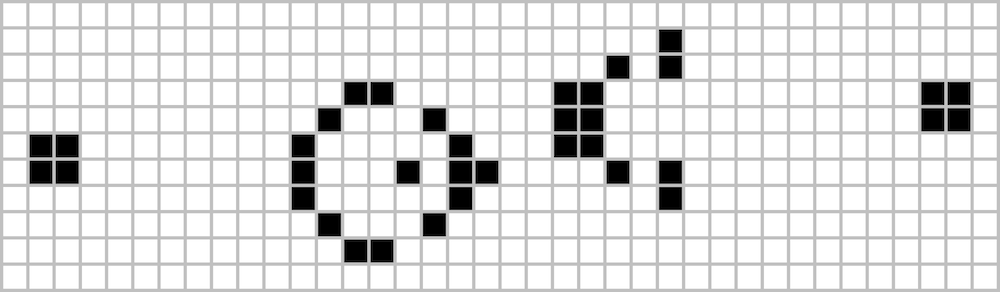
The GGG is difficult, heavy-duty hardware. If and when you can get it firing, then I for one will be very impressed. Send me an email in order to receive an ASCII art trophy. Make a GIF to show your friends.
6. Change the rules of Life
What happens if you change the way that Life works? What happens if you change the rules so that live cells can never die? Or so that dead cells have a 20% chance of randomly coming back to life each round? Or so that there is a third type of zombie cell that wanders around the board eating its neighbors? Or so that the thresholds for living and dying oscillate and change over time?
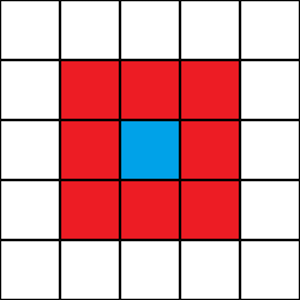
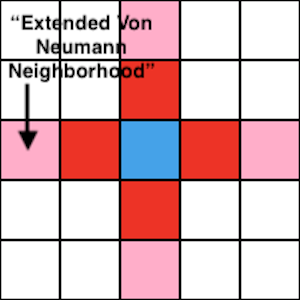
In Life, cells look at their 8 immediate neighbors. This is known as the Moore Neighborhood.
But what happens if you play Life with the Von Neumann neighborhood?
Or even a different neighborhood of your own invention?
You should only need to edit your next_board_state function in order to implement a new set of Life rules. You should be able to reuse your render and load_board_state functions, as well as your infinite loop code. However, don’t actually edit your next_board_state function. Instead, make new functions with names that describe their rules, for example next_board_state_with_zombies. This way you’ll build up a library of functions that can run all kinds of different weird and wonderful cellular automata.
If you do need to edit more than your next_board_state function in order to implement a new ruleset, try to restructure your code so that you don’t. Have a look at my example code if that helps. The practice of splitting your code into cleanly separated pieces that you can mix and match and reuse is a known as modularity. In our Life implementation, we have individual components for generating new boards (dead_state and random_state), loading boards from files (load_board_state), calculating the next board state (next_board_state), printing the board to the terminal (render), and looping the game forever (everything else). This separation of responsibilities makes it easier to understand how your program is structured, and makes it easier to update a component without breaking any of the others. We’ll talk about this much more in future projects.
7. Even more extensions
- Research and implement Langton’s Ant
- Research and implement Brian’s Brain
- Research and implement Day and Night
- Make a command line tool that allows the user to choose which of your cellular automa they would like to run
- Implement the terminal UI using
curses
- Make your board rainbow colored
- There’s an incredible amount of research available on Cellular Automata. Get Googling and come up with your own extensions
I’m going to be writing more advanced-beginner programming projects like this one. Subscribe to my newsletter to get updates when new projects are published.
This is a programming project for Advanced Beginners. If you’ve completed all the introductory tutorials and short exercises you can find, but are not sure how to continue developing your skills, this project is for you. It is structured and guided, whilst still leaving all of the difficult work to you. You can do it in whichever programming language you happen to be learning, and if you get stuck I’ll help you out over email, Twitter or Skype.
Subscribe to my new "Programming Feedback for Advanced Beginners" newsletter to receive concise weekly emails containing specific, real-world ways to make your code cleaner and more professional.
Each week I review code sent to me by one of my readers. I highlight the things that I like, discuss the things that I think could be better, and offer suggestions for how the author could make their code cleaner and easier to work with.
Subscribe now to receive these invaluable improvements in your inbox every week, completely free.
You’re going to build the famous and fascinating system known as “Conway’s Game of Life”. This will not be easy, but I guarantee that you will succeed. And once you’re finished you can create exquisite gifs of your work to share with your friends and extended family.
This is what it will look like
Throughout the course of the project, you will learn:
- How to structure large programs
- How to break down projects down into manageable chunks and milestones
- How to write automated tests so that your computer verifies that your code is correct for you
If you get stuck (defined as making zero progress for 30 minutes), you can get some inspiration from my example project. I’ve written it in Python, but I’ve also tried to avoid using any Python-specific constructs. It should therefore be a useful reference regardless of which language you are using. If your code looks different from mine, then as long as it works don’t worry! There are usually many different ways to solve the same problem.
If you get completely stuck (defined as making zero progress for 60 minutes), take a break and come back later with a clear mind. If you would like to, send me an email or a Tweet and I’ll do my level best to try and help you over the bump.
Let’s begin.
Introduction to Life
Game of Life (or just “Life”) is not really a game. There’s no winning or losing or destroying your opponent mentally and spiritually. Life is a “cellular automaton” - a system of cells that live on a grid, where they live, die and evolve according to the rules that govern their world.
Life’s simple, elegant rules give rise to astonishingly complex emergent behavior. It is played on a 2-D grid. Each square in the grid contains a cell, and each cell starts the game as either “alive” or “dead”. Play proceeds in rounds. During each round, each cell looks at its 8 immediate neighbors and counts up the number of them that are currently alive.
The cell then updates its own liveness according to 4 rules:
- Any live cell with 0 or 1 live neighbors becomes dead, because of underpopulation
- Any live cell with 2 or 3 live neighbors stays alive, because its neighborhood is just right
- Any live cell with more than 3 live neighbors becomes dead, because of overpopulation
- Any dead cell with exactly 3 live neighbors becomes alive, by reproduction
And that’s all there is to Life. These 4 rules give rise to some unbelievably complex and beautiful patterns, and an equally unbelievable quantity of analysis by Life devotees intent on discovering new ones. Here’s a Pulsar, an alien-like Life oscillator.
Here’s a Gosper Glider Gun, a pattern that shoots missiles across the world.
Here’s a Life Rube Goldberg Machine that is more technologically advanced than your phone.
And here’s a wonderful forum where adventurers search for more Life gold dust.
In this project we’re going to build a Game of Life that runs in your terminal. You’ll create your own Pulsars and Gosper Glider Guns, as well as Puffers, Lightweight Spaceships, and Toads. You’ll generate random worlds and watch them evolve. And you’ll tweak the rules of Life and see what happens. Maybe you’ll change the life and death thresholds, or add entirely new states (zombie cells that eat their neighbors?), or just turn the board rainbow-colored.
Sadly, changing the rules of Life does not allow you to change the rules of life. But it will make you a more experienced and proficient programmer.
Milestones
Big projects are easier to work on if you break them up into small, testable chunks. This allows you to focus on doing one, manageable thing at a time. You can then build your large, complex program out of simpler pieces that you have tested and that you trust. This isn’t cheating, it’s just good technique.
You wouldn’t try to build every part of an entire house all at once. You’d break it down and plan it out. You’d build the foundations, check that they work, build the walls, check that they work. At this point my knowledge of how to build an actual house breaks down, but I think that the principle is clear.
A good set of milestones for this project could be:
- Build a data structure to store the board state
- “Pretty-print” the board to the terminal
- Given a starting board state, calculate the next one
- Run the game forever
Then some extensions:
- Save interesting starting positions to files and add the ability to reload them into your Life
- Improve the User Interface
- Change the rules of Life
Milestones can even be broken down into smaller milestones. Say you’re trying to calculate the next board state. How about starting by simply calculating the next state of a single cell, and making absolutely sure that that works? Then, once you’ve the logic for a single cell worked out, you can start looking at how to apply this logic to every other cell as well. Once again, not cheating, just good technique. We’ll talk much more about milestones throughout the project.
1. Store the board state
The ultimate goal of the first milestone is to create a function called random_state. This function will take in 2 arguments - your board’s width and its height. It will return a board state in which every cell has been randomly initialized to either ALIVE (represented by a 1) or DEAD (represented by a 0). In Life these random patterns are known as “Soups”, and they are the quickest way for us to start producing interesting output.
The Life world is a 2-D grid. Regardless of language, 2-D grids are almost always represented in code using a list of lists:
board_state = [
[1,1,1,1,1,1,1],
[1,1,1,1,1,1,1],
[1,1,1,1,1,1,1],
[1,1,1,1,1,1,1],
[1,0,1,1,1,1,1],
[1,1,1,1,1,1,1]
]
You can then access the cells in the grid like this:
board_state[4][1]
board_state[4] accesses the 5th element of board_state, which in our example is the sub-list [1,0,1,1,1,1,1]. board_state[4][1] accesses the 2nd element of the 5th element of board_state, which has the value 0. This is very similar to the cartesian co-ordinate system that you may be familiar with already.
Let’s break this milestone down further. We are faced with at least 2 challenges - working out how to create a board of the right size, and working out how to randomly initialize each cell to either 0 or 1 (dead or alive). Let’s tackle these problems separately.
Even though we eventually want to write a random_state function, let’s start by writing a simpler dead_state function. Like random_state, dead_state will accept 2 arguments - a width and a height. It too will return a board, width by height in size. However, unlike random_state, every cell in this board will be initialized to 0. Give this a go. Use Google as much as you need to. Break it down into even smaller steps if that helps.
Test your program out by printing a dead state to the terminal. It will probably look quite ugly, but that’s OK.
width = 5
height = 5
print dead_state(width, height)
=> [[0,0,0,0,0], [0,0,0,0,0], .... # etc...
Once your dead_state function is working, you’ve already written half of random_state! You can use dead_state at the start of random_state to create the 2-D grid data-structure, and then all that’s left is to randomize the state of each cell.
def random_state(width, height):
# Build the board using your previous work
state = dead_state(width, height)
# TODO: randomize each element of `state`
# to either 0 or 1
A common way to randomize choices like this is to take advantage of your language’s built-in random number generator (RNG) library. You can use an RNG library to produce a random number between 0.0 and 1.0, and then pass this number through if-statements in order to decide whether your cell is dead or alive. For example, this code snippet initializes cell_state to 0 or 1, with a 50% probability of each.
random_number = random.random()
if random_number >= 0.5:
cell_state = 0
else:
cell_state = 1
Think about how the probabilities of setting the cell state to 0 or 1 would change if you adjusted the threshold in the if random_number >= 0.5: line. What would happen if you changed the threshold to 0.9? What about 0.05? Experiment with different values and see how they change the way your random board looks.
2. Pretty-print the board to the terminal
You can already print your board to your terminal using your language’s standard print function. But it probably doesn’t look like the lush, verdant world that I promised you a few paragraphs ago.
[[0, 1, 1, 0, 0, 0, 0, 1, 1, 1, 0, 0, 1, 0, 0, 1... # etc
In this milestone we’re going to write a render function. It will take 1 argument - a board state, just like those returned by the dead_state and random_state functions. The render function will format the board state and print it to the terminal.
-----------------
|# ### # ## # |
|## ## ## # |
|## ### # #|
|etc... |
You can use whatever characters (or even colors) you like to represent dead and live cells. As always, think about how you can break this task up into smaller pieces. Start by printing only the first row. How can you build on this to print the whole board?
Once you’ve got a render function that you believe works, double-check it by printing some of your states from the previous milestone.
a_dead_state = dead_state(20, 30)
render(a_dead_state)
a_random_state = random_state(20, 30)
render(a_random_state)
Make sure that they look reasonable. Are they the right height and width? Do they have roughly the number of alive and dead cells you would expect? You may need to zoom out on your terminal (using Ctrl+- or Cmd+-) in order to see the full width and height of the board.
3. Calculate the next state of the board
We’ve created the initial Life board and we’ve built the tools that we need to observe it. Now we’re ready to set it in motion. In this milestone we’re going to write a next_board_state function. It will take 1 argument - an initial board state. It will then use this argument to calculate and return the next board state, according to the rules of Life that we saw in the introduction:
- Any live cell with 0 or 1 live neighbors becomes dead, because of underpopulation
- Any live cell with 2 or 3 live neighbors stays alive, because its neighborhood is just right
- Any live cell with more than 3 live neighbors becomes dead, because of overpopulation
- Any dead cell with exactly 3 live neighbors becomes alive, by reproduction
Spend some time thinking about how to structure this milestone. What are the different challenges? Could you break them up into smaller pieces? Very roughly, how might your code look?
Below are 4 hints to help you get over some gotchas that might trip you up: testing, storing the new board state, iterating over the board, and dealing with cells on the edges. They’re there to help you if you get stuck, but if you don’t need them then don’t read them!
Once your next_board_state function passes all of your tests (see Hint 0) and looks sensible when you use render to print its results, you’re ready to go on to the final part of Life.
Hint 0 - Testing
The next_board_state function is much harder to test by eye than our previous functions. It was obvious when dead_state and render were working - could you see the board, and were all the cells dead? It’s much less clear whether every aspect of your next_board_state logic is correct. If you start with an initial board state of:
-------
|## #|
| ## |
| # #|
|## # |
|#####|
-------
And get back a new board state of:
-------
|### |
| ## |
| # |
| |
|# ##|
-------
Is this correct? It looks reasonable. But should that cell in the middle of the second row definitely be alive? What about the one on the right edge of the fifth row? We could recalculate every cell by hand and check that they match our program’s output, but that’s no way to spend your precious limited time on this earth.
The best and most systematic way to tackle this testing teaser is to write “unit tests”. Unit tests are small snippets of code that take your program for an automatic test drive. They programmatically verify that your functions return the right outputs when given certain inputs, and makes sure that they don’t throw any unexpected errors.
For example, here are some Life unit tests. The first test makes sure that dead cells with no live neighbors stay dead. The second makes sure that dead cells with exactly 3 live neighbors come alive:
from game_of_life import next_board_state
# TODO: there's a lot of repeated code here. Can
# you move some of into reusable functions to
# make it shorter and neater?
if __name__ == "__main__":
# TEST 1: dead cells with no live neighbors
# should stay dead.
init_state1 = [
[0,0,0],
[0,0,0],
[0,0,0]
]
expected_next_state1 = [
[0,0,0],
[0,0,0],
[0,0,0]
]
actual_next_state1 = next_board_state(init_state1)
if expected_next_state1 == actual_next_state1:
print "PASSED 1"
else:
print "FAILED 1!"
print "Expected:"
print expected_next_state1
print "Actual:"
print actual_next_state1
# TEST 2: dead cells with exactly 3 neighbors
# should come alive.
init_state2 = [
[0,0,1],
[0,1,1],
[0,0,0]
]
expected_next_state2 = [
[0,1,1],
[0,1,1],
[0,0,0]
]
actual_next_state2 = next_board_state(init_state2)
if expected_next_state2 == actual_next_state2:
print "PASSED 2"
else:
print "FAILED 2!"
print "Expected:"
print expected_next_state2
print "Actual:"
print actual_next_state2
If your next_board_state function is correct then these tests will print out PASSED 1, PASSED 2, etc. And if they discover a bug in next_board_state, they will fail and print the unexpected result. You can then update your code, re-run the tests, and verify that you fixed the bug without accidentally breaking something else.
Few people would claim that unit tests are the most exciting part of programming. Nonetheless, they are extremely important. They make your code more reliable, easier to work with, and much, much easier to verify. Of course, your tests are only as useful as you make them. The more tests you have, the fewer bugs will slip past you.
Copy the example tests above into a separate file, and import the necessary functions from your main program file. Now you have 2 programs that you can run. You have the main program that runs Life, and you have the test suite that checks that your main program is behaving itself. If you’re having trouble with cross-file imports, you can also just copy the unit tests into your main program file and comment them out when you don’t want to run them. This isn’t ideal, but it’s much better than throwing yourself out of a window because you can’t get your import statement to work.
Try writing some more test cases. How could you check that live cells die when they have more than 3 live neighbors? How could you make sure that everything works as expected for cells on the edges of the board and in the corners? If you ever manually find a bug that wasn’t caught by your test suite, add a test that would have caught it to make sure it never comes back.
Hint 1 - How to store the new state?
Your next_board_state function gets passed 1 argument - an initial_state. It is tempting to directly update this variable as you calculate the new state. However, this will quickly cause problems. Suppose that you are calculating the new state one row at a time, and are directly updating the initial_state variable using code like:
# !!!!!! DANGER DANGER! !!!!!!
# We've worked out that cell (x, y) should become
# dead. Let's update its value in `initial_state`.
# !!!!!! DANGER DANGER! !!!!!!
initial_state[x][y] = 0
Your initial_state variable now contains the new values of the current row, but still contains the old values of the next row! When you come to calculate the new state of the next row, you will be using the NEW liveness values of the current row. You’ve stomped over and lost the current row’s old values, which is what you should be using to calculate the new state of the next row. Your program won’t throw any errors, but it will give some very strange results.
A clean way around this problem is to begin next_board_state by initializing a new_state variable using your dead_state function.
new_state = dead_state(width, height)
Then when you calculate the next state of a cell, you update its value in new_state, leaving initial_state untouched and available for use in future calculations.
# We've worked out that cell (x, y) should become
# dead. Let's therefore update its value in
# `new_state` (this is fine!).
new_state[x][y] = 0
Hint 2 - Iterating over the board and calculating the number of live neighbors
You can iterate over every cell in the grid using a nested for-loop that might look something like:
for x in range(0, height):
for y in range(0, width):
current_cell_value = initial_state[x][y]
# TODO: calculate the number of live
# neighbors...
The neighbors of cell (x, y) are the cells that are 1 space either side of it, in any direction - initial_state[x-1][y-1], initial_state[x][y-1], initial_state[x+1][y-1], initial_state[x-1][y], and so on. How can you add up the number of these neighbors that are alive? How can you do it without having to write a new if-statement for every neighbor?
Hint 3 - Dealing with cells on the edges
Cells in the centre of the board have 8 neighbors. However, cells on the edges have 5, and cells right in the corners have just 3.
Depending on which language you are using, you may run into problems if you accidentally try to access the minus-1th or 11th element of a 10 element array. You may see either Array Index Out of Bounds errors or odd, unexpected game behavior. I can think of 2 good ways to deal with this:
- Treat edge cells as having 5 neighbors, and corner cells as having 3. Add if-statements (
if x < 0...) to guard against the errors that are caused by trying to access elements that don’t exist. - Wrap the board round in a circle. Cells on the top and bottom edges count as each others’ neighbors, as do those on the left and right edges. This means that every cell has 8 neighbors.
4. Run Life forever
We know how to build the Life board. We know how to run a single round. All that remains is to make our system run forever.
It’s time for us to create eternal Life.
First we need to initialize our starting state. Second, we need to pass this state into our next_board_state function. Third and finally we need to run in an infinite loop, each time passing the previous result of next_board_state back into the next call of the function.
And after each iteration of our infinite loop, we need to use our render function to print the new board state to the terminal. This won’t overwrite the board state that was printed to your terminal in the last iteration - we’re simply appending more output. But each state will flash by so fast that it will look like a fancy, auto-updating UI.
Once you have this working, you will have built Life! Congratulations, that was not easy. Spend a few hours staring at its hypnotic beauty.
Final task - say hi!
If you’ve successfully made it this far then I’d love to know! I’m going to be making more advanced-beginner projects like this, and I’d like to understand how to make them as useful as possible. Please send me an email to tell me about your achievement. I’d love to hear from you. You can also sign up for my mailing list at the bottom of this page to find out when I publish more advanced-beginner projects. I’m planning on writing at least 1 per month.
Subscribe to my new "Programming Feedback for Advanced Beginners" newsletter to receive concise weekly emails containing specific, real-world ways to make your code cleaner and more professional.
Each week I review code sent to me by one of my readers. I highlight the things that I like, discuss the things that I think could be better, and offer suggestions for how the author could make their code cleaner and easier to work with.
Subscribe now to receive these invaluable improvements in your inbox every week, completely free.
Once you’ve sent me that quick message, it’s time to move on to Life’s extensions.
5. Load from a file
We’re in the big leagues now, so you’re going to get even fewer pointers than before.
So far we’ve been running “soups”. A soup is a random Life pattern that (usually) explodes in a burst of pixellated fireworks and then gradually fades out. But if all we do is make random soups, we’ll never get to see any of intricate patterns carefully designed and discovered by generations of Life devotees. In this extension exercise, you’re going to write the initial states of patterns into text files, load them into your program, and use them to create intelligently designed Life.
Let’s start by making a Toad.
Open a new file named toad.txt in the same directory as your program. We’ll use this file to store a Toad. We’ll encode Life states in the file using a grid of 0s and 1s - 0 to represent dead cells, and 1 for live ones. For example, here’s our Toad:
000000
000000
001110
011100
000000
000000
Copy these 0s and 1s into your toad.txt file. Write code to load the Toad into your Life and run it. This might look something like:
# You'll have to write the `load_board_state`
# function yourself!
initial_state = load_board_state("./toad.txt")
# Now run your Life using your previous code,
# starting from this initial_state
When you run your program a Toad should appear, peacefully flip-flopping in the middle of your screen. Make and run files for other patterns, like the Beacon, the Blinker, and the Glider.
![]()
Then, when you’re ready, make a Gosper Glider Gun.
Here’s a schematic of the initial state:
The GGG is difficult, heavy-duty hardware. If and when you can get it firing, then I for one will be very impressed. Send me an email in order to receive an ASCII art trophy. Make a GIF to show your friends.
6. Change the rules of Life
What happens if you change the way that Life works? What happens if you change the rules so that live cells can never die? Or so that dead cells have a 20% chance of randomly coming back to life each round? Or so that there is a third type of zombie cell that wanders around the board eating its neighbors? Or so that the thresholds for living and dying oscillate and change over time?
In Life, cells look at their 8 immediate neighbors. This is known as the Moore Neighborhood.
But what happens if you play Life with the Von Neumann neighborhood?
Or even a different neighborhood of your own invention?
You should only need to edit your next_board_state function in order to implement a new set of Life rules. You should be able to reuse your render and load_board_state functions, as well as your infinite loop code. However, don’t actually edit your next_board_state function. Instead, make new functions with names that describe their rules, for example next_board_state_with_zombies. This way you’ll build up a library of functions that can run all kinds of different weird and wonderful cellular automata.
If you do need to edit more than your next_board_state function in order to implement a new ruleset, try to restructure your code so that you don’t. Have a look at my example code if that helps. The practice of splitting your code into cleanly separated pieces that you can mix and match and reuse is a known as modularity. In our Life implementation, we have individual components for generating new boards (dead_state and random_state), loading boards from files (load_board_state), calculating the next board state (next_board_state), printing the board to the terminal (render), and looping the game forever (everything else). This separation of responsibilities makes it easier to understand how your program is structured, and makes it easier to update a component without breaking any of the others. We’ll talk about this much more in future projects.
7. Even more extensions
- Research and implement Langton’s Ant
- Research and implement Brian’s Brain
- Research and implement Day and Night
- Make a command line tool that allows the user to choose which of your cellular automa they would like to run
- Implement the terminal UI using
curses - Make your board rainbow colored
- There’s an incredible amount of research available on Cellular Automata. Get Googling and come up with your own extensions
I’m going to be writing more advanced-beginner programming projects like this one. Subscribe to my newsletter to get updates when new projects are published.