How to man-in-the-middle proxy your IOT devices
21 Nov 2019
My wife and I recently had a baby boy. Rave reviews and hopeful optimism outweighed our natural skepticism, and we rented him a Snoo. A Snoo is a smart-crib that rocks your baby to sleep and plays him soothing white noise. If it hears him getting grumpy, it ratchets up the speed and the volume to try to make him happy again.

For some reason, you have to control the Snoo from a smartphone app. I’d much prefer it if they ditched the whole internet-of-things angle and just gave me some buttons that I can press with my real-world fingers and that don’t stop working when my wi-fi goes down. I do feel like I’m from the future when I show my parents how I can wobble my baby using only my phone, but it’s a future where no one has given much thought to exactly why the future is better than the past. Perhaps there’s a use-case that I’m missing.
Nonetheless, I figured that if the Snoo people were going to make their crib wi-fi enabled then I might as well have some fun when Oscar wasn’t using it. I went in search of security flaws in the crib that would allow me to take control of it and use it for my various nefarious schemes. I didn’t find any particularly heinous vulnerabilities, but I did find a small protocol downgrade bug, which allowed me to force the Snoo to send some of its status data over unencrypted HTTP instead of HTTPS. Whilst this is certainly a problem, I couldn’t immediately see any way to convert this toehold into something that would materially help me with any of my villainous plans. I sent an email to the Snoo team describing the bug. They were very pleasant and responsive, and told me they would fix it in their next firmware update.
In this post we will look at how I was able to find this bug, and how you can use the same techniques to examine the behavior of your own IOT devices, be they cribs, fridges, lightbulbs, or exercise bikes. We’ll learn a lot about TLS, DNS, TCP, and make a lot of beautiful stories to tell our grandchildren along the way.
In order to probe the Snoo’s behavior, I had to attempt a man-in-the-middle attack against it. This technique, which we will discuss in more detail below, is most commonly used in order to snoop on the network activity of smartphone apps. However, in order to be used against internet of things (IOT) devices, it requires some creative adaptation.
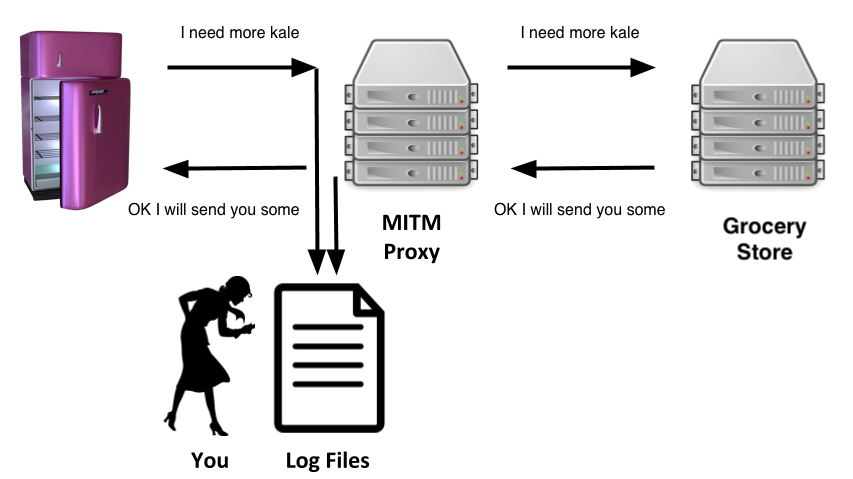
When man-in-the-middle-ing a device, we intercept and inspect the online traffic that goes in and out of it. This allows us to understand, and potentially modify, how it works. Your IOT device probably talks to a server, to which it relays back analytics and instructions it has received from its user. It is this connection that we are going to insert ourselves - using your laptop - into the middle of.
As mentioned above, the man-in-the-middle technique is most commonly used in order to snoop on the network activity of smartphone apps. Much has already been written about this process. For an introduction, see for example the documentation for Burp Suite, a popular security testing tool.
Using the technique on your smartphone is easy because it is “proxy-aware”. Much has also been written about proxies. For a very brief introduction, see section 1 of my series on “How to build a TCP Proxy”.
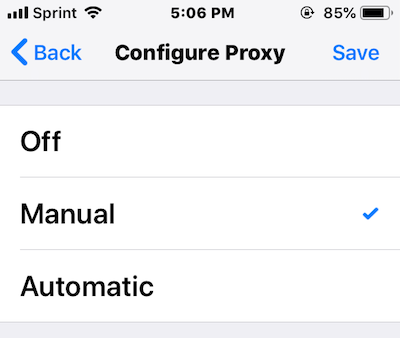
Because your smartphone is proxy-aware, it has a straightforward option in its Settings menu that allows you to configure it to use an HTTP proxy. If you do so then your phone will automatically send all of its HTTP traffic via that proxy. If you tell your phone to use your laptop as its proxy then you can inspect and massage its traffic using proxy tools like Burp Suite and Charles.
However, most black-box IOT devices don’t give you a similar option to configure a proxy (probably for reasons of simplicity, rather than any particular desire for secrecy) and so this simple approach won’t work for them. There’s every chance that your device has the theoretical ability to use a proxy, but doesn’t expose this functionality to its users. If you want to tear apart your smartfridge in search of a USB port so that you can talk directly to the embedded system then be my guest, but be aware that there’s some chance that you’ll end up with a rogue fridge that orders you 2^64 cartoons (that’s a joke, not a typo) of almond milk every clock tick.
This means that we need to get creative. We need to come up an alternative way to ask your device to send its traffic via your laptop. Then we can intercept and inspect its traffic by correctly configuring the same proxy tools that you may have used for intercepting traffic from smartphones or desktop apps (like Burp or Charles). Tricking your device into sending its traffic via your laptop and correctly configuring a proxy tool are the two challenges standing between us and being able to snoop on your device. We will solve both of them in the rest of this post.
Before we go any further, a brief note about TLS. Unfortunately for us, if your device has implemented the TLS protocol correctly, its communication will be encrypted in a way that we can’t decrypt. We’ll talk more about why later, but I wanted to warn you about this possibility up front. Nonetheless, we’ll never know whether your device has any TLS flaws until we look, and even if its implementation is cast iron, we’ll still learn a thing or two about networking along the way.
First, let’s look at how to get your device to send its traffic via your laptop. To do this, we will trick your device into thinking that your laptop is the remote server that it wants to talk to, by spoofing responses to your device’s DNS requests.
Devices use DNS requests to translate domains into IP addresses. Suppose that your device communicates over HTTP with a server that has the domain robertheaton.com. Your device can’t just send requests to robertheaton.com, because the internet routing system doesn’t understand domain names. All it understands are IP addresses. This means that before your device can send any traffic, it has to translate this domain into an IP address. It does so by sending a DNS request to a DNS server, asking “what is the IP address for the domain robertheaton.com?”
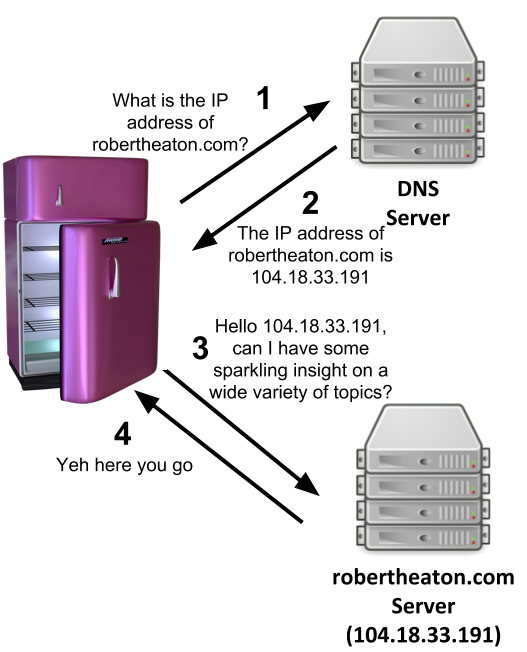
Normally this request would go to a real DNS server, which would look up the domain (we don’t need to go into exactly how), and respond “the IP address for robertheaton.com is 104.18.33.191”. Your device would then send its request directly to 231.8.77.142, not going via your laptop in any way. This is not what we want to happen.
Instead, we will use your laptop to watch your network for DNS requests sent by your device, and quickly fire off our own DNS responses before the real DNS server has had a chance to respond. When your device asks “what is the IP address for the domain robertheaton.com?” we will reply “the IP address for robertheaton.com is INSERT_YOUR_LAPTOPS_IP_ADDRESS_HERE”. Your device will see no reason to doubt this information, and so will obediently start sending its traffic to your laptop’s IP address, instead of that of the real robertheaton.com server. Once your device’s traffic hits your laptop we can intercept and forward it using a properly configured Burp Suite or similar.

So far, so good. However, actually getting your laptop to watch for your device’s DNS requests will require some work. In general, just being on the same network as your device is not enough, since your laptop will by default mostly ignore packets that aren’t explicitly addressed to it. Fortunately, we have an easy solution to this problem. We will connect your laptop to a wired network, and configure your laptop to share this wired network’s internet connection over a new wi-fi network. When you do this, your laptop acts as a wi-fi network and router that other devices can connect to. We can then tell your IOT device to connect to your laptop’s network. Here’s how to share an internet connection on OSX; similar functionality probably exists for your OS too.
Once your device is connected to your laptop’s network, you will be able to use a tool like Wireshark to read all of the packets that your device sends to the rest of the world. This is because your laptop is now acting as your device’s network router, and so your device’s packets need to travel through your laptop in order to reach the public internet. This means that we can write programs that are triggered by your device’s DNS requests, and fire back our own DNS responses. Using a library like Python’s scapy, we can write a program to:
- Watch for traffic coming from your device that is sent over UDP to port 53 (the transport protocol and port used for DNS)
- When it sees traffic like this, assume it is a DNS request and attempt to read the requested domain out of it (eg.
api.fridges.com)
- If the domain is the one we are trying to spoof, send back a response to your device saying “the IP address for
api.fridges.com is INSERT_YOUR_LAPTOPS_IP_ADDRESS_HERE”.
- If the domain is not the one we are trying to spoof, do nothing
I’ve described DNS-spoofing is much more detail in parts 1 and 2 of my series on building your own TCP proxy. In part 2 I’ve even written an example scapy script that performs the above spoofing. For INSERT_YOUR_LAPTOPS_IP_ADDRESS_HERE, you will need to use your laptop’s IP address on the interface corresponding to the network that it is the router for. For me this interface was called bridge100. You may need to do some investigating to figure out your equivalent.
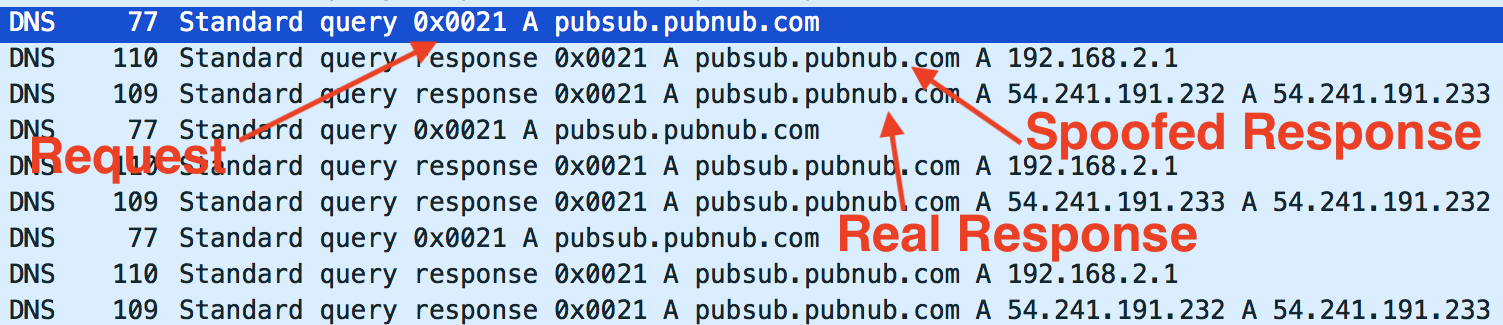
Even once you’ve got your DNS-spoofing script working, you may find that the real DNS server that your device contacts is able to send a DNS response to your device faster than your program is. This will mess up your spoofing strategy, since your device will likely believe and store the first response it receives. You can diagnose this problem using Wireshark. Open Wireshark and look for DNS requests. If you see two responses in quick succession, look at the IP addresses inside them to see which is your spoofed response and which is the real one. If the real one is sent to your device first, you have a problem.
How you solve this problem depends on whether your device is trying to do its DNS resolution by asking your laptop (in its capacity as a network router), or by asking a DNS server directly (like Google’s server at IP address 8.8.8.8). You can work out what your device is doing by looking at the dst field in Wireshark for the offending second DNS request.
If your device is asking your laptop to do its DNS resolution then you can stop your laptop from responding by disabling DNS resolution on your laptop. Maybe there’s a handy setting that can do this directly. Another option is to set the DNS server that your laptop forwards your device’s DNS request to to be a server inside your local network that doesn’t exist, like 192.168.0.200. Make sure to use an IP address inside your local network (starting with 192.168.) so that you don’t start sending your DNS requests to some random computer on the internet. Doing this will cause the forwarded DNS request to fail, and so your laptop will not respond to your device with the correct IP address. This means that the only resolved IP address that your device sees will be the one that we explicitly fake. This is exactly what we want.
On the other hand, if your device is directly talking to a specific DNS server then you can use a tool like Linux’s iptables or OSX’s pfctl to block traffic from your laptop to that IP address. I won’t go in to the details of this here, since Google has a lot of details available on these topics already.
Once you have your device connected to a network shared by your laptop and you have your DNS-spoofing script working, your device will have been tricked into sending all of its internet traffic that relies on DNS resolution to your laptop. Since your laptop doesn’t yet know what to do with this traffic, it will drop it on the floor and your device will not be able to contact its remote server. Your device will probably look like it is broken. Our next step is therefore to teach your laptop what to do with the traffic it receives.
Once it receives traffic from your device, your laptop needs to do several things:
- Present your device with a valid-ish looking TLS certificate (assuming your device is at least attempting to use TLS)
- Receive traffic from your device
- Forward it on to the device’s server
- Forward the server’s response back to your device
If your device is communicating with its server using HTTP then you can perform all of these steps using Burp Suite or whatever your favorite HTTP proxy tool is. If your device is using some other TCP-based protocol then you may need to write your own proxy. This is actually not so difficult, and I’ve described how to do it in great detail in my series about TCP proxies.
For this post, let’s assume that your device is indeed using HTTP, and that your favorite proxy is Burp Suite. Before we start a Burp proxy, we’ll need to configure Burp to deal with our slightly non-standard situation. Proxy-aware clients - like your phone - make Burp’s life easier by sending helpful proxy-related instructions along with their HTTP request. The most important piece of extra information that proxy-aware clients send is a small HTTP request before each main HTTP request, called a CONNECT request. A CONNECT tells the proxy the domain that the client would like the subsequent main request to be forwarded to. This is so that proxies are able to forward encrypted HTTP requests, even if they are unable to decrypt them. Burp uses CONNECT requests to decide where to forward the client’s traffic, as well as what domain should be in the TLS certificate that it presents to the client (read my post about HTTPS for more details on TLS certificates).
As we discussed at the start of this post, your IOT device is almost certainly not proxy-aware and so will not send Burp a CONNECT request. We therefore need to make several adjustments to Burp to help it deal with this:
- We need to warn Burp that it is not going to receive any CONNECT requests from your device, and that it should not throw an error because of this. We can do this by turning on “Invisible Mode”
- We need to configure Burp’s certificate options so that it always sends a certificate containing a specific, hard-coded domain. We can look at your device’s DNS requests in Wireshark to see which domain your device communicates with the most, and use that one (of course, if your device isn’t doing any validation on the TLS certificate it receives, it doesn’t matter what domain you put in the certificate).
- If you disabled your laptop’s network’s DNS resolution in the previous step then Burp won’t be able to resolve the domain in the request to an IP address. You can overcome this problem by using Burp’s built-in hostname resolution functionality to force it to resolve the domain you’re interested in to its correct IP address. This setting is very similar to the
/etc/hosts file that hard-codes DNS resolutions into your entire system.
Once you’ve changed all of these settings, you’ll need to make sure that your proxy is listening on the correct network interface. If you’re feeling lucky and impatient then you can tell it to listen on all interfaces (0.0.0.0), but this comes with some elevated security risks. Much safer is to work out which IP address in the dropdown list of interfaces corresponds to the network created by your laptop. On my Mac this was the bridge100 interface. I ran ifconfig to find the IP address corresponding to this interface, and told Burp to listen on that one.
Now that we’re tricking your device into sending its traffic to your laptop and we’ve configured Burp to properly accept this traffic, we’re ready to run the whole contraption end-to-end. For simplicity I recommend initially testing this process using your phone - try to proxy the traffic from your phone to a specific website via your laptop, without using your phone’s HTTP proxy setting. To do this:
- Connect your laptop to your router using an ethernet cable
- Share your laptop’s wired network over wi-fi
- Connect your device to this shared network
- Run your DNS spoofing script
- Open Burp Suite and configure it as above (download Burp Suite if you don’t already have it)
- Open Wireshark to help debug any problems (download Wireshark if you don’t already have it)
- Watch Burp and Wireshark and see what you see
If traffic starts appearing in Burp then congratulations! Your device is incorrectly validating TLS certificates. This is a significant vulnerability in itself, and you should now feel highly motivated to go in search of more security holes.
However, if TLS certificate validation has been implemented correctly on your device, this step will be very anti-climactic. You will see nothing in Burp, and TLS HANDSHAKE FAILED alerts in Wireshark.

This is probably because your device is correctly validating the TLS certificate that Burp presents it with. It sees that the certificate from Burp is signed by Portswigger (the company that makes Burp), and that Portswigger is not in its list of trusted root CAs. It therefore refuses to trust the certificate, and fails the TLS handshake.
When you use this technique to man-in-the-middle your smartphone, you can add Portswigger’s CA certificate to your phone’s list of trusted root CAs. This tells your phone to trust the certificates that Burp presents to it, which allows the TLS handshake to succeed. Unfortunately, if you can’t get access to your IOT device’s hardware in order to add a new root CA to it, your journey mostly ends here. Don’t lose hope though. Leave your setup running for a while and see if anything strange happens. When I attempted the above process on my baby’s crib, the device refused to trust Burp’s certificate and so refused to complete a TLS handshake with my laptop. But after a minute or two of repeated failures, the crib started sending out some of its system status data over plain, unencrypted HTTP!
There was no obviously sensitive data contained in the messages, but there were credentials that authenticated my Snoo device to the Snoo servers. An attacker who messed with my crib’s TLS handshakes in the same way that I had would have been able to read the same data and credentials that I could. I haven’t tried very hard to work out what they could achieve with this information. The answer is probably “not much”, but this is much less certain than if the Snoo was encrypting all of its traffic, all the time.
This is a good illustration of why it can be interesting and worthwhile to man-in-the-middle your IOT devices, even though a correctly-implemented TLS stack will spoil your fun. TLS implementations can go wrong in all kinds of surprising ways. Developers of embedded devices are operating under tighter constraints than those working on phone or computer apps, and they may feel that they need to make more tradeoffs between security and usability. They may also just get careless since they don’t think that anyone is going to be poking at their black box.
So sharpen your poking stick, and see what you can jab.
My wife and I recently had a baby boy. Rave reviews and hopeful optimism outweighed our natural skepticism, and we rented him a Snoo. A Snoo is a smart-crib that rocks your baby to sleep and plays him soothing white noise. If it hears him getting grumpy, it ratchets up the speed and the volume to try to make him happy again.
For some reason, you have to control the Snoo from a smartphone app. I’d much prefer it if they ditched the whole internet-of-things angle and just gave me some buttons that I can press with my real-world fingers and that don’t stop working when my wi-fi goes down. I do feel like I’m from the future when I show my parents how I can wobble my baby using only my phone, but it’s a future where no one has given much thought to exactly why the future is better than the past. Perhaps there’s a use-case that I’m missing.
Nonetheless, I figured that if the Snoo people were going to make their crib wi-fi enabled then I might as well have some fun when Oscar wasn’t using it. I went in search of security flaws in the crib that would allow me to take control of it and use it for my various nefarious schemes. I didn’t find any particularly heinous vulnerabilities, but I did find a small protocol downgrade bug, which allowed me to force the Snoo to send some of its status data over unencrypted HTTP instead of HTTPS. Whilst this is certainly a problem, I couldn’t immediately see any way to convert this toehold into something that would materially help me with any of my villainous plans. I sent an email to the Snoo team describing the bug. They were very pleasant and responsive, and told me they would fix it in their next firmware update.
In this post we will look at how I was able to find this bug, and how you can use the same techniques to examine the behavior of your own IOT devices, be they cribs, fridges, lightbulbs, or exercise bikes. We’ll learn a lot about TLS, DNS, TCP, and make a lot of beautiful stories to tell our grandchildren along the way.
In order to probe the Snoo’s behavior, I had to attempt a man-in-the-middle attack against it. This technique, which we will discuss in more detail below, is most commonly used in order to snoop on the network activity of smartphone apps. However, in order to be used against internet of things (IOT) devices, it requires some creative adaptation.
When man-in-the-middle-ing a device, we intercept and inspect the online traffic that goes in and out of it. This allows us to understand, and potentially modify, how it works. Your IOT device probably talks to a server, to which it relays back analytics and instructions it has received from its user. It is this connection that we are going to insert ourselves - using your laptop - into the middle of.
As mentioned above, the man-in-the-middle technique is most commonly used in order to snoop on the network activity of smartphone apps. Much has already been written about this process. For an introduction, see for example the documentation for Burp Suite, a popular security testing tool.
Using the technique on your smartphone is easy because it is “proxy-aware”. Much has also been written about proxies. For a very brief introduction, see section 1 of my series on “How to build a TCP Proxy”.
Because your smartphone is proxy-aware, it has a straightforward option in its Settings menu that allows you to configure it to use an HTTP proxy. If you do so then your phone will automatically send all of its HTTP traffic via that proxy. If you tell your phone to use your laptop as its proxy then you can inspect and massage its traffic using proxy tools like Burp Suite and Charles.
However, most black-box IOT devices don’t give you a similar option to configure a proxy (probably for reasons of simplicity, rather than any particular desire for secrecy) and so this simple approach won’t work for them. There’s every chance that your device has the theoretical ability to use a proxy, but doesn’t expose this functionality to its users. If you want to tear apart your smartfridge in search of a USB port so that you can talk directly to the embedded system then be my guest, but be aware that there’s some chance that you’ll end up with a rogue fridge that orders you 2^64 cartoons (that’s a joke, not a typo) of almond milk every clock tick.
This means that we need to get creative. We need to come up an alternative way to ask your device to send its traffic via your laptop. Then we can intercept and inspect its traffic by correctly configuring the same proxy tools that you may have used for intercepting traffic from smartphones or desktop apps (like Burp or Charles). Tricking your device into sending its traffic via your laptop and correctly configuring a proxy tool are the two challenges standing between us and being able to snoop on your device. We will solve both of them in the rest of this post.
Before we go any further, a brief note about TLS. Unfortunately for us, if your device has implemented the TLS protocol correctly, its communication will be encrypted in a way that we can’t decrypt. We’ll talk more about why later, but I wanted to warn you about this possibility up front. Nonetheless, we’ll never know whether your device has any TLS flaws until we look, and even if its implementation is cast iron, we’ll still learn a thing or two about networking along the way.
First, let’s look at how to get your device to send its traffic via your laptop. To do this, we will trick your device into thinking that your laptop is the remote server that it wants to talk to, by spoofing responses to your device’s DNS requests.
Devices use DNS requests to translate domains into IP addresses. Suppose that your device communicates over HTTP with a server that has the domain robertheaton.com. Your device can’t just send requests to robertheaton.com, because the internet routing system doesn’t understand domain names. All it understands are IP addresses. This means that before your device can send any traffic, it has to translate this domain into an IP address. It does so by sending a DNS request to a DNS server, asking “what is the IP address for the domain robertheaton.com?”
Normally this request would go to a real DNS server, which would look up the domain (we don’t need to go into exactly how), and respond “the IP address for robertheaton.com is 104.18.33.191”. Your device would then send its request directly to 231.8.77.142, not going via your laptop in any way. This is not what we want to happen.
Instead, we will use your laptop to watch your network for DNS requests sent by your device, and quickly fire off our own DNS responses before the real DNS server has had a chance to respond. When your device asks “what is the IP address for the domain robertheaton.com?” we will reply “the IP address for robertheaton.com is INSERT_YOUR_LAPTOPS_IP_ADDRESS_HERE”. Your device will see no reason to doubt this information, and so will obediently start sending its traffic to your laptop’s IP address, instead of that of the real robertheaton.com server. Once your device’s traffic hits your laptop we can intercept and forward it using a properly configured Burp Suite or similar.
So far, so good. However, actually getting your laptop to watch for your device’s DNS requests will require some work. In general, just being on the same network as your device is not enough, since your laptop will by default mostly ignore packets that aren’t explicitly addressed to it. Fortunately, we have an easy solution to this problem. We will connect your laptop to a wired network, and configure your laptop to share this wired network’s internet connection over a new wi-fi network. When you do this, your laptop acts as a wi-fi network and router that other devices can connect to. We can then tell your IOT device to connect to your laptop’s network. Here’s how to share an internet connection on OSX; similar functionality probably exists for your OS too.
Once your device is connected to your laptop’s network, you will be able to use a tool like Wireshark to read all of the packets that your device sends to the rest of the world. This is because your laptop is now acting as your device’s network router, and so your device’s packets need to travel through your laptop in order to reach the public internet. This means that we can write programs that are triggered by your device’s DNS requests, and fire back our own DNS responses. Using a library like Python’s scapy, we can write a program to:
- Watch for traffic coming from your device that is sent over UDP to port 53 (the transport protocol and port used for DNS)
- When it sees traffic like this, assume it is a DNS request and attempt to read the requested domain out of it (eg.
api.fridges.com) - If the domain is the one we are trying to spoof, send back a response to your device saying “the IP address for
api.fridges.comis INSERT_YOUR_LAPTOPS_IP_ADDRESS_HERE”. - If the domain is not the one we are trying to spoof, do nothing
I’ve described DNS-spoofing is much more detail in parts 1 and 2 of my series on building your own TCP proxy. In part 2 I’ve even written an example scapy script that performs the above spoofing. For INSERT_YOUR_LAPTOPS_IP_ADDRESS_HERE, you will need to use your laptop’s IP address on the interface corresponding to the network that it is the router for. For me this interface was called bridge100. You may need to do some investigating to figure out your equivalent.
Even once you’ve got your DNS-spoofing script working, you may find that the real DNS server that your device contacts is able to send a DNS response to your device faster than your program is. This will mess up your spoofing strategy, since your device will likely believe and store the first response it receives. You can diagnose this problem using Wireshark. Open Wireshark and look for DNS requests. If you see two responses in quick succession, look at the IP addresses inside them to see which is your spoofed response and which is the real one. If the real one is sent to your device first, you have a problem.
How you solve this problem depends on whether your device is trying to do its DNS resolution by asking your laptop (in its capacity as a network router), or by asking a DNS server directly (like Google’s server at IP address 8.8.8.8). You can work out what your device is doing by looking at the dst field in Wireshark for the offending second DNS request.
If your device is asking your laptop to do its DNS resolution then you can stop your laptop from responding by disabling DNS resolution on your laptop. Maybe there’s a handy setting that can do this directly. Another option is to set the DNS server that your laptop forwards your device’s DNS request to to be a server inside your local network that doesn’t exist, like 192.168.0.200. Make sure to use an IP address inside your local network (starting with 192.168.) so that you don’t start sending your DNS requests to some random computer on the internet. Doing this will cause the forwarded DNS request to fail, and so your laptop will not respond to your device with the correct IP address. This means that the only resolved IP address that your device sees will be the one that we explicitly fake. This is exactly what we want.
On the other hand, if your device is directly talking to a specific DNS server then you can use a tool like Linux’s iptables or OSX’s pfctl to block traffic from your laptop to that IP address. I won’t go in to the details of this here, since Google has a lot of details available on these topics already.
Once you have your device connected to a network shared by your laptop and you have your DNS-spoofing script working, your device will have been tricked into sending all of its internet traffic that relies on DNS resolution to your laptop. Since your laptop doesn’t yet know what to do with this traffic, it will drop it on the floor and your device will not be able to contact its remote server. Your device will probably look like it is broken. Our next step is therefore to teach your laptop what to do with the traffic it receives.
Once it receives traffic from your device, your laptop needs to do several things:
- Present your device with a valid-ish looking TLS certificate (assuming your device is at least attempting to use TLS)
- Receive traffic from your device
- Forward it on to the device’s server
- Forward the server’s response back to your device
If your device is communicating with its server using HTTP then you can perform all of these steps using Burp Suite or whatever your favorite HTTP proxy tool is. If your device is using some other TCP-based protocol then you may need to write your own proxy. This is actually not so difficult, and I’ve described how to do it in great detail in my series about TCP proxies.
For this post, let’s assume that your device is indeed using HTTP, and that your favorite proxy is Burp Suite. Before we start a Burp proxy, we’ll need to configure Burp to deal with our slightly non-standard situation. Proxy-aware clients - like your phone - make Burp’s life easier by sending helpful proxy-related instructions along with their HTTP request. The most important piece of extra information that proxy-aware clients send is a small HTTP request before each main HTTP request, called a CONNECT request. A CONNECT tells the proxy the domain that the client would like the subsequent main request to be forwarded to. This is so that proxies are able to forward encrypted HTTP requests, even if they are unable to decrypt them. Burp uses CONNECT requests to decide where to forward the client’s traffic, as well as what domain should be in the TLS certificate that it presents to the client (read my post about HTTPS for more details on TLS certificates).
As we discussed at the start of this post, your IOT device is almost certainly not proxy-aware and so will not send Burp a CONNECT request. We therefore need to make several adjustments to Burp to help it deal with this:
- We need to warn Burp that it is not going to receive any CONNECT requests from your device, and that it should not throw an error because of this. We can do this by turning on “Invisible Mode”
- We need to configure Burp’s certificate options so that it always sends a certificate containing a specific, hard-coded domain. We can look at your device’s DNS requests in Wireshark to see which domain your device communicates with the most, and use that one (of course, if your device isn’t doing any validation on the TLS certificate it receives, it doesn’t matter what domain you put in the certificate).
- If you disabled your laptop’s network’s DNS resolution in the previous step then Burp won’t be able to resolve the domain in the request to an IP address. You can overcome this problem by using Burp’s built-in hostname resolution functionality to force it to resolve the domain you’re interested in to its correct IP address. This setting is very similar to the
/etc/hostsfile that hard-codes DNS resolutions into your entire system.
Once you’ve changed all of these settings, you’ll need to make sure that your proxy is listening on the correct network interface. If you’re feeling lucky and impatient then you can tell it to listen on all interfaces (0.0.0.0), but this comes with some elevated security risks. Much safer is to work out which IP address in the dropdown list of interfaces corresponds to the network created by your laptop. On my Mac this was the bridge100 interface. I ran ifconfig to find the IP address corresponding to this interface, and told Burp to listen on that one.
Now that we’re tricking your device into sending its traffic to your laptop and we’ve configured Burp to properly accept this traffic, we’re ready to run the whole contraption end-to-end. For simplicity I recommend initially testing this process using your phone - try to proxy the traffic from your phone to a specific website via your laptop, without using your phone’s HTTP proxy setting. To do this:
- Connect your laptop to your router using an ethernet cable
- Share your laptop’s wired network over wi-fi
- Connect your device to this shared network
- Run your DNS spoofing script
- Open Burp Suite and configure it as above (download Burp Suite if you don’t already have it)
- Open Wireshark to help debug any problems (download Wireshark if you don’t already have it)
- Watch Burp and Wireshark and see what you see
If traffic starts appearing in Burp then congratulations! Your device is incorrectly validating TLS certificates. This is a significant vulnerability in itself, and you should now feel highly motivated to go in search of more security holes.
However, if TLS certificate validation has been implemented correctly on your device, this step will be very anti-climactic. You will see nothing in Burp, and TLS HANDSHAKE FAILED alerts in Wireshark.
This is probably because your device is correctly validating the TLS certificate that Burp presents it with. It sees that the certificate from Burp is signed by Portswigger (the company that makes Burp), and that Portswigger is not in its list of trusted root CAs. It therefore refuses to trust the certificate, and fails the TLS handshake.
When you use this technique to man-in-the-middle your smartphone, you can add Portswigger’s CA certificate to your phone’s list of trusted root CAs. This tells your phone to trust the certificates that Burp presents to it, which allows the TLS handshake to succeed. Unfortunately, if you can’t get access to your IOT device’s hardware in order to add a new root CA to it, your journey mostly ends here. Don’t lose hope though. Leave your setup running for a while and see if anything strange happens. When I attempted the above process on my baby’s crib, the device refused to trust Burp’s certificate and so refused to complete a TLS handshake with my laptop. But after a minute or two of repeated failures, the crib started sending out some of its system status data over plain, unencrypted HTTP!
There was no obviously sensitive data contained in the messages, but there were credentials that authenticated my Snoo device to the Snoo servers. An attacker who messed with my crib’s TLS handshakes in the same way that I had would have been able to read the same data and credentials that I could. I haven’t tried very hard to work out what they could achieve with this information. The answer is probably “not much”, but this is much less certain than if the Snoo was encrypting all of its traffic, all the time.
This is a good illustration of why it can be interesting and worthwhile to man-in-the-middle your IOT devices, even though a correctly-implemented TLS stack will spoil your fun. TLS implementations can go wrong in all kinds of surprising ways. Developers of embedded devices are operating under tighter constraints than those working on phone or computer apps, and they may feel that they need to make more tradeoffs between security and usability. They may also just get careless since they don’t think that anyone is going to be poking at their black box.
So sharpen your poking stick, and see what you can jab.